Bandsaw Setup and Resawing
The bandsaw is the hand-tool shop's favorite machine: it rips, cuts curves, and resaws thick boards into thin ones without kickback. Choosing blades, tensioning and tracking, setting guides, handling drift, and resawing.
- 5 min
- 7 steps
- 3 questions
- Lesson 35 of 160
In this lesson
- Why a bandsaw
- Blades
- Setup
- Drift
- Resawing
- Safety
- What to take from this
Picking up where you left off.
Why a bandsaw
A bandsaw’s blade is a continuous steel loop running over two wheels, cutting downward toward the table. That direction is the key to its safety: the cutting force pushes the work onto the table, so there’s essentially no kickback, the hazard that makes the table saw dangerous 1. It also:
- Rips boards of any thickness.
- Cuts curves: chair parts, cabriole legs, bowl blanks.
- Resaws: slices a thick board into thinner ones, making bookmatched panels, veneer, or more yield from a board.
- Cuts thick stock and green wood a table saw can’t.
The trade-off is a rougher surface that needs planing, and slower straight cuts. In hand-tool shops, a bandsaw plus panel saws covers almost every cut.
Quick check
A continuous band cuts downward toward the table. It leaves a rougher surface, but the risk of the work being thrown back is essentially gone.
Blades
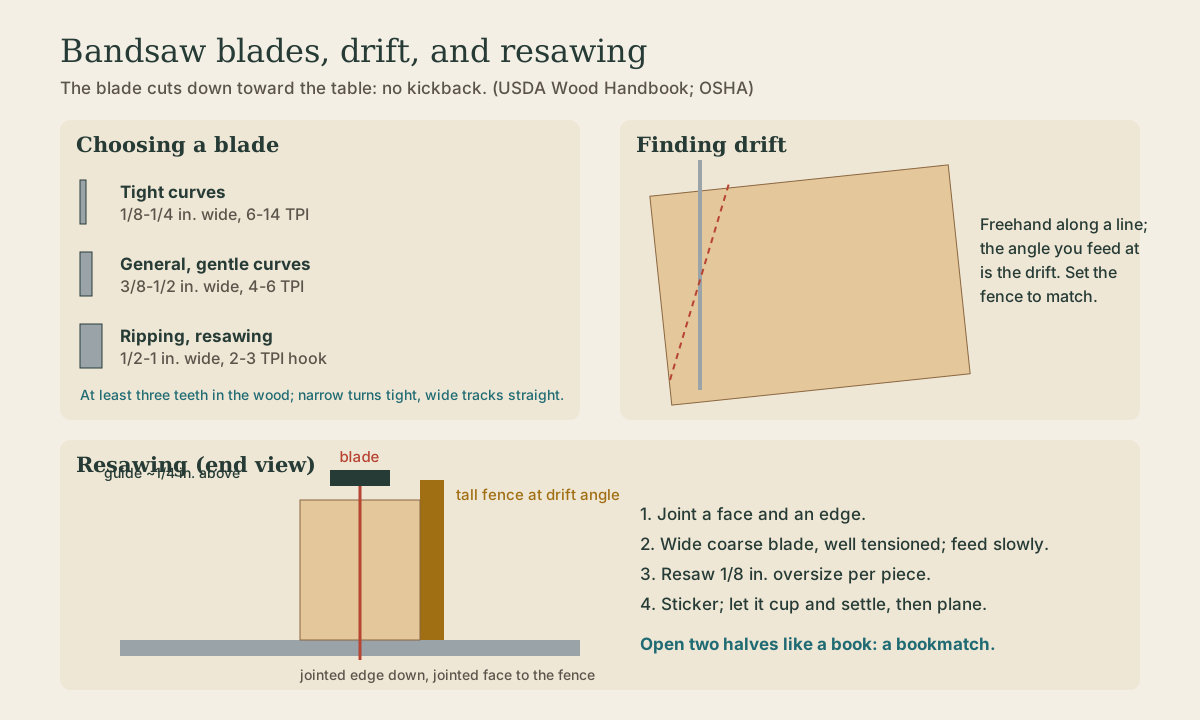
Choose blade width by the cut and teeth per inch (TPI) by the stock thickness:
| Job | Width | TPI |
|---|---|---|
| Tight curves | 1/8 to 1/4 in. | 6 to 14 |
| General work, gentle curves | 3/8 to 1/2 in. | 4 to 6 |
| Ripping and resawing | 1/2 to 1 in. | 2 to 3 (hook tooth) |
Narrower blades turn tighter radii; wider blades track straighter. Coarse teeth with deep gullets clear sawdust in thick stock; fine teeth leave a smoother cut in thin stock. Aim for at least three teeth in the wood at all times. Bimetal and carbide blades last far longer than carbon steel for resawing.
Quick check
Wide blades track straight in tall cuts; coarse teeth with deep gullets clear the large volume of sawdust.
Setup
- Tension: follow the saw’s gauge or the blade maker’s recommendation. Wider blades need more tension; too little lets the blade wander.
- Track: with the guides backed off, spin the top wheel by hand and adjust its tilt until the blade runs centered on the tire.
- Guides: set the side guides just clear of the blade, behind the gullets, and the rear thrust bearing just behind the blade’s back edge, both above and below the table.
- Upper guide height: about 1/4 inch above the work, which also acts as the blade guard.
- Table square to the blade.
Drift
Many blades cut slightly off a straight line, called drift, because of uneven set. To find it, draw a line parallel to a board’s edge and freehand-cut along it; note the angle the board must be fed at to stay on the line, and set the fence to that angle. Or use a tall point fence (a single-point pivot) that lets you steer the cut.
Resawing
Resawing turns one thick board into two or more thinner ones:
- Joint one face and one edge square. The jointed face goes against the fence, the edge on the table.
- Use a tall fence (or a resaw fence about half the board’s width) set to the drift angle.
- Use a wide, coarse blade, sharp and well tensioned.
- Feed slowly and steadily; let the blade clear chips. Use a push block at the end.
- Resaw oversize, at least 1/8 inch over final thickness per piece.
Resawn boards often cup or bow as soon as they come off the saw: resawing exposes interior wood that may be wetter or hold growth stress 2. Sticker the pieces so air reaches both faces, let them settle for a few days, then plane to final thickness.
Bookmatching: open two resawn pieces like a book and edge-glue them, so the grain mirrors across the joint. Classic for door panels and box lids.
Quick check
Resaw oversize, sticker the halves so both faces can breathe, and let them settle before final planing.
Safety
- Keep the upper guide about 1/4 inch above the work.
- Keep fingers out of the blade’s line; use a push stick near the end of a cut.
- Back out of a curved cut only with the saw off or very carefully; better, make relief cuts first so offcuts fall away.
- If a blade breaks, step back and turn the saw off; don’t open the doors until the wheels stop.
What to take from this
The bandsaw cuts down toward the table, so it rips, curves, and resaws without kickback. Choose narrow blades for curves and wide, coarse ones for resawing; tension, track, and set guides carefully; and find the blade’s drift. Resaw jointed boards against a tall fence, cut oversize, and sticker the halves to settle before final planing.
Lesson complete
Nice work.
Sources for this lesson
- 1Woodworking eTool: Kickbacks. Occupational Safety and Health Administration. verifiedKickback is the saw seizing the stock and hurling it back; spreaders and anti-kickback fingers, sharp properly set blades, sound stock, and standing to the side prevent it.
- 2Samuel V. Glass, Samuel L. Zelinka. Moisture Relations and Physical Properties of Wood (Wood Handbook, Chapter 4). USDA Forest Service, Forest Products Laboratory, FPL-GTR-282. 2021. verifiedFree and bound water, fiber saturation (~30%), EMC table (Table 4-2), green moisture by species (Table 4-1), shrinkage by species (Table 4-3), and the shrinkage equation.
Previous: Jointer and Planer: Flat, Square, and to Thickness