Tempering, Annealing, and Normalizing
The other three heat treatments: normalizing to refine grain after forging, annealing to make steel soft enough to file and drill, and tempering hardened steel back to toughness - in an oven or by running temper colors - with how to pick a temper for each tool.
- 4 min
- 5 steps
- 3 questions
- Lesson 92 of 204
In this lesson
- Normalizing
- Annealing
- Tempering
- Choosing a temper
- What to take from this
Picking up where you left off.
Normalizing
Forging leaves steel with uneven, coarse grain and internal stress. Normalizing heats it past nonmagnetic and lets it cool in still air, refining the grain and evening out the structure before hardening.
For 1084 the supplier gives three cycles stepping down: about 1,650°F, 1,500°F, then 1,350°F, each held briefly and air-cooled until black and magnetic again 1. In a forge: heat to a bright red past nonmagnetic, air-cool to black, and repeat two or three times at slightly lower heats.
Normalize after heavy forging, before hardening, and whenever a piece has warped or been overheated.
Annealing
Annealing makes steel as soft as possible so it can be filed, drilled, or sawn. Heat past nonmagnetic and cool as slowly as possible: bury it in vermiculite, wood ash, or lime, or leave it in a forge or kiln that cools overnight. Bacon notes hardened steel heated to about 650°F loses its temper and can be filed 2, but a full anneal goes much higher and cools far slower.
Anneal unknown or hard scrap before shaping it cold, and anneal tools you want to reshape.
Quick check
Anneal before filing or drilling; normalize after forging and before hardening.
Tempering
Quenched steel is at its hardest and too brittle for most uses 3. Tempering - Bacon’s “drawing the temper” - reheats it to a few hundred degrees, giving up some hardness for toughness 2. Do it right after the quench.
Oven tempering (most reliable):
- Clean the scale off so you can see the color.
- Put the piece in a preheated oven (verify with an oven thermometer) at the target temperature, often 400°F for a 1084 knife.
- Hold 1-2 hours, cool, and repeat a second time.
- 1084 tempered at 300°F stays about 65 HRC; at 650°F it drops to about 50 HRC 1.
Running the colors (traditional, for chisels and punches):
- Polish the working end bright after hardening.
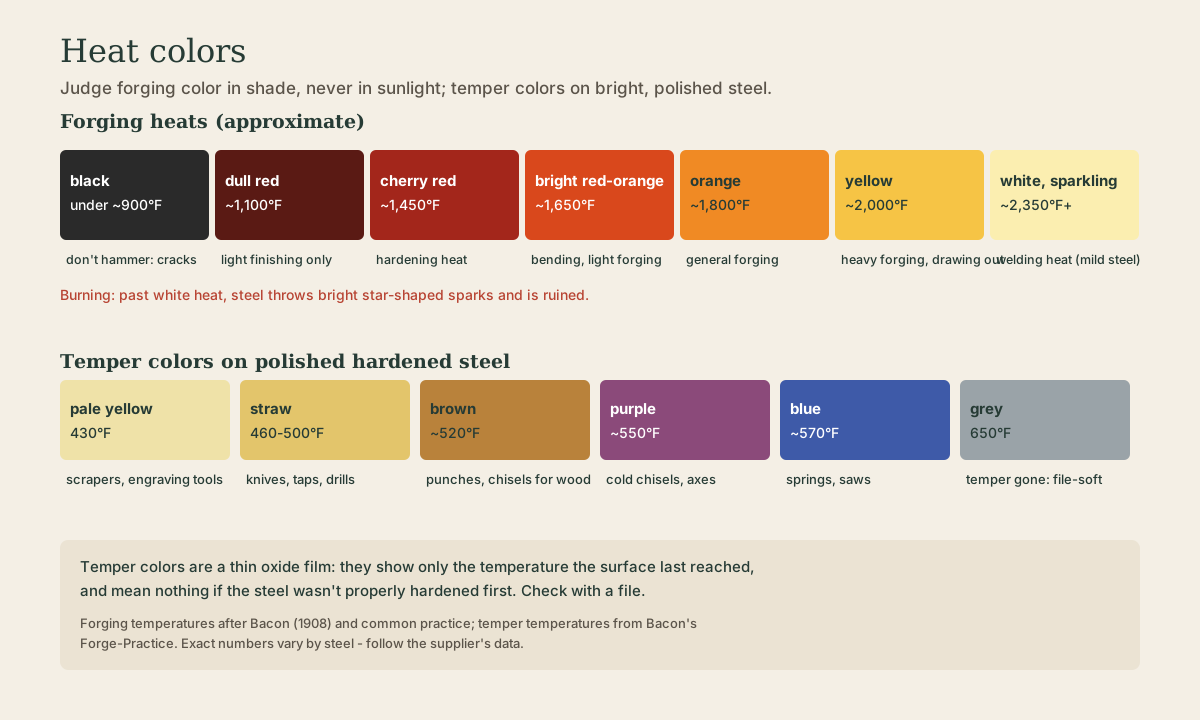
- Heat the thick part of the tool behind the edge - in the forge, on a hot bar, or with a torch - and watch the colors run toward the edge: pale yellow, straw, brown, purple, blue 2.
- When the color you want reaches the edge, quench to stop it.
Bacon’s older method hardens only the tip of a cold chisel, then lets heat from the shank run the color back to the edge before a final quench 2.
The colors show only the temperature last reached, and mean nothing if the steel wasn’t hardened 2; test with a file.
Quick check
Bacon calls it ‘drawing the temper.’
Choosing a temper
| Tool | Temper | Approx. °F |
|---|---|---|
| Scrapers, engraving tools | pale yellow | 430 |
| Knives, wood chisels, gouges | straw to dark straw | 450-500 |
| Punches, wood-splitting tools | brown | ~520 |
| Cold chisels, axes | purple | 540-560 |
| Springs, saws | blue | ~570 |
After Bacon 2 and the temper color table 3. Hit-tools (punches, chisels) need toughness at the struck end: draw the striking end soft (blue or beyond) and keep the cutting end harder.
Quick check
Springs need toughness and flex; edge tools need hardness.
What to take from this
Normalize after forging - heat past nonmagnetic and air-cool, two or three cycles - to refine grain. Anneal by cooling very slowly when you need steel soft enough to file or drill. Temper right after hardening, ideally twice in an oven (400°F for a 1084 knife), or run temper colors to the edge and quench. Pick the temper by job: straw for edge tools, purple for cold chisels and axes, blue for springs.
Lesson complete
Nice work.
Sources for this lesson
- 11084 Knife-Making Blade Steel. Blacksmiths Depot. verifiedSupplier heat-treat guidance for eutectoid 1084 - normalizing cycles stepping down from about 1,650 F, hardening at 1,450-1,480 F with a 5-15 minute soak, a fast oil quench (Parks 50), about 64-65 HRC as quenched, and tempering from 300 F (about 65 HRC) to 650 F (about 50 HRC).
- 2John Lord Bacon. Forge-Practice: Elementary. John Wiley & Sons. 1908. verifiedPublic-domain trade-school text from the Lewis Institute; fire building with coking coal, welding heat and fluxes (sand, borax, sal ammoniac), upsetting, drawing out, bending, punching, and tool-steel hardening and tempering colors (430 F pale yellow to 570 F blue, temper gone near 650 F).
- 3Tempering (metallurgy). Wikipedia. 2026. verifiedQuenched steel is at its hardest and most brittle; tempering trades some hardness for toughness. Temper color table from faint yellow (about 349 F) through straw, brown, purple, and blues.