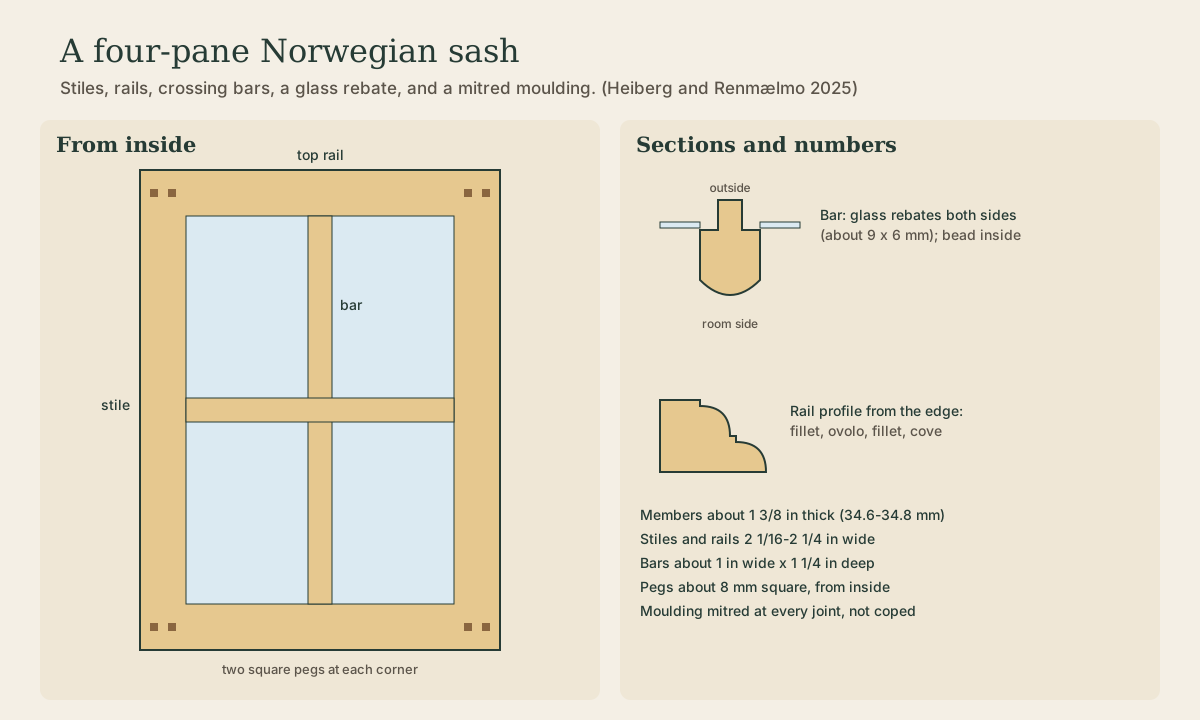
Cutting the Sash Joints
Days one and two: orient and square the stock, lay out from the light lines, saw and chop open mortise-and-tenon corners, and cut the bar joints, with the horizontal bar tenoned into the stiles and the vertical bar either halved across it or made in short tenoned pieces as in the 18th-century Trondheim sashes.
- 4 min
- 7 steps
- 2 questions
- Lesson 119 of 204
In this lesson
- Orient and square
- Lay out
- Corner joints
- Bar joints
- Pace
- Try it
Picking up where you left off.
The 18th-century study behind this module found the most natural order for a joiner: cut all the joints on square stock first, then plane the glass rebates, then mould the profiles 1. These first two days are the joints.
Orient and square
North House starts from pre-milled stock 2. Plane each piece square and to exact width and thickness; every member of a sash must be the same thickness or the faces won’t flush. Then orient the grain. On the Stiftsgården sashes the pith side faces outward and toward the center of the sash 1. Norwegian practice describes window parts as seen from the outside, and Norwegian tools and benches are right-handed 1. Mark each piece’s face and edge.
Lay out
Clamp the stiles together and the rails together and mark them as pairs from the rod:
- the outer ends;
- the light lines, the inside edges of the pane openings;
- the rebate depth and the depth of the moulding.
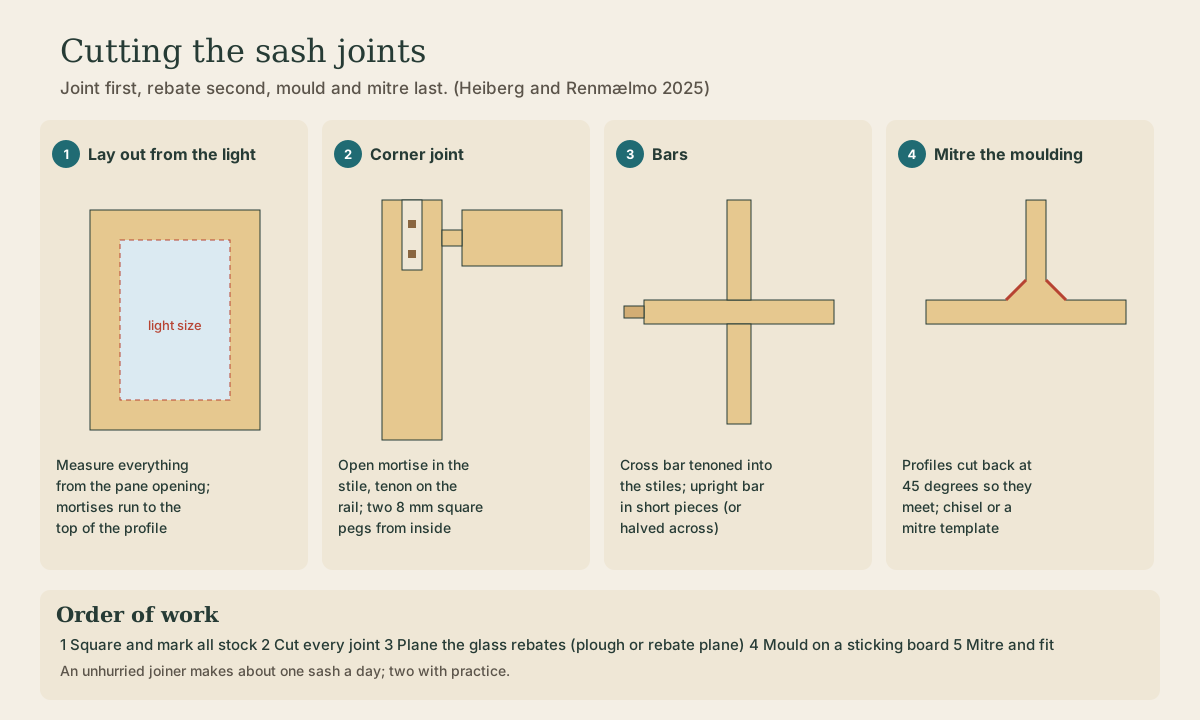
Every dimension comes from the light size, and each bar mortise runs from the light line to the top of the profile 1. Set a mortise gauge to the tenon thickness (a third of the stock is the usual rule of thumb) and gauge every joint from the face side.
Quick check
The bar mortises run from the light line to the top of the profile.
Corner joints
The corners are open mortise and tenon joints, a slot in one member and a tenon on the other, like a bridle 1:
- Saw the tenon cheeks on the rail ends, on the waste side of the gauge lines, and saw the shoulders.
- Saw down both sides of the slot in the stile end, then chop out the waste with a chisel from both faces toward the middle.
- Pare to fit: the tenon should slide in with hand pressure.
- Leave the moulded and rebated portion of each shoulder long for now; it gets cut back when you mitre the moulding.
At Stiftsgården each corner was locked with two square pegs, 8 by 8 mm, driven from the interior face 1. You’ll drill for them at assembly.
Quick check
Stiftsgården’s sashes use two 8 x 8 mm pegs at each corner.
Bar joints
The bars are about 1 inch wide 1. At Stiftsgården the horizontal bars were tenoned into the stiles, and the vertical bar was made in separate pieces, one between each rail and bar, each tenoned at both ends 1. For a four-pane sash you can follow that, or run the vertical bar full length and halve it across the horizontal one, each bar cut half-depth where they cross. North House’s description mentions only “a crossed vertical and horizontal bar” 2, so either is defensible.
Mortises for the bars run from the light line to the top of the profile, as laid out. Cut tenons on the bar ends a hair long and trim to fit.
Playback is optional. If the player is unavailable, open the video at its source.
Pace
Heiberg’s team found an experienced joiner makes about one sash a day at a calm pace, two with practice 1. Two days for the joints of a first sash is ordinary.
Try it
Cut one corner joint in scrap before the real stock. Check that the tenon’s shoulders close tight on both faces at once; a gap on one face means the shoulder isn’t square to the face.
Lesson complete
Nice work.
Sources for this lesson
- 1Thor-Aage Kaminka Heiberg, Roald Renmælmo. Rediscovering the 18th Century Wooden Casement Window Manufacturing Process at Trondheim Stiftsgården. Studia Vernacula 17, 170-199. 2025. verifiedStiftsgården sashes (1774-78): 48 x 25 1/2 in, six lights; stiles and rails 2 1/16-2 1/4 in wide, 34.6-34.8 mm thick; stile edges beveled about 8-10 degrees to open freely; corners open mortise and tenon, each locked with two 8 x 8 mm square pegs driven from the interior. Horizontal bars tenoned into the stiles; the vertical bar in separate pieces between rails and bar; bars 25.5 mm (1 in) wide x 31.75 mm (5/4 in) high. Casing rebate 5/8 in (1/2 in usual); casing head dovetailed to the jambs. Probably Scots pine; pith side facing out and toward the sash center. Norway normally mitres the moulding at rail and bar joints rather than coping. Trondheim profile from the edge: fillet, ovolo, fillet, cove; on bars the quarter-rounds meet as a bead. Glass rebate on museum planes about 9 x 6 mm. Two workflows tested: joint first and mould after (judged the more natural joiner's sequence), or mould first with side plane and mitre chisel. Take dimensions from the inside light size; a sticking board holds bars for moulding. About one sash per day at a calm pace, two with practice.
- 2Traditional Building: Norwegian Sash Windows. North House Folk School. verifiedNine days with a day off (May 4-12, 2027), instructor Thor-Aage Kaminka Heiberg (master joiner, head of NTNU's Norwegian traditional building crafts program); tuition $875, materials $180. Build a traditional Norwegian sash window in its casing with hand-tool joinery: first four days the sash from pre-milled stock, rails and stiles with a crossed vertical and horizontal bar, open mortises and tenons locked with pegs; next four days the casing from rough-sawn boards, planed straight and flat by hand, cut to size, a couple of strategies for the sash rabbet, dovetailed corners; all parts moulded with traditional sash profiles using planes the instructor provides. Students bring home a four-pane window; glazing is done at home. All tools provided; optional scrub, smoothing, jointer and block planes, saws, chisels, mallet, mortise gauge, plow and rabbet planes.