Sleeves, Gussets, and Side Seams
Day three: the part of the busserull that makes it a work shirt. Pleat the sleeve ends to the cuff, sew square gussets into the underarms, set the sleeves into the body, and sew one long seam from cuff to hem through the gusset, stopping for the side slits.
- 3 min
- 5 steps
- 2 questions
- Lesson 134 of 204
In this lesson
- Pleat the sleeves
- The gusset
- One long seam
- The back belt
- Try it
Picking up where you left off.
A busserull was made for “full range of movement for vigorous work” like blacksmithing, fishing, and forestry 1. The sleeves and gussets are where that comes from.
Pleat the sleeves
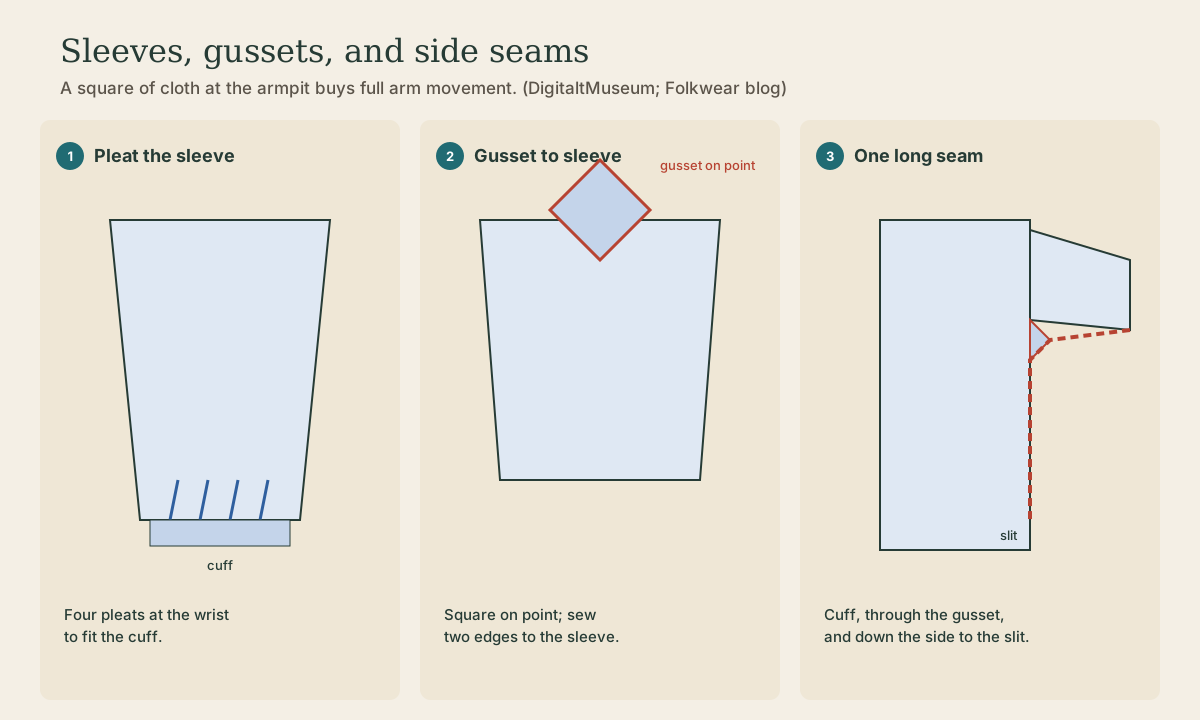
A busserull sleeve is a wide rectangle gathered into a narrow cuff with pleats. The Tromsø shirt has 6 pleats at the wrist, and pleats at the top of the sleeve too, 2 in front and 2 behind 2; Folkwear’s pattern uses four pleats at each cuff end 3. Mark the pleats with chalk, fold them toward the back of the arm, and baste them in place a scant 1/2 inch from the edge so they hold until the cuff goes on.
The gusset
The gusset is a small square of cloth set into the armpit: on the Lands Museum shirt it’s 9 x 9 cm 4. On the Tromsø shirt it’s cut in one with the front of the sleeve rather than as a separate piece 2. Either way works; a separate square is easier to sew.
Folkwear’s order is gussets to sleeves first, then sleeves to body 3:
- Turn the gusset on point, like a diamond.
- Sew two adjacent edges of the gusset to the two underarm edges of the sleeve, right sides together, stopping exactly at the seam allowance at the corner.
- Set the sleeve into the body at the shoulder, matching the top of the sleeve to the end of the yoke.
Quick check
Two edges go to the sleeve and two to the body side seam.
One long seam
Now the side seam runs in one pass 3: start at the cuff end of the sleeve, sew up the sleeve’s underarm, pivot through the gusset’s two free edges, and continue down the side of the body. Stop at the top of the side slit: about 5 cm on the Lands Museum shirt 4. Backstitch firmly at the pivot points and at the top of the slit, where the strain falls.
Finish the seams (zigzag, serge, or turn and stitch) and press them toward the back.
Playback is optional. If the player is unavailable, open the video at its source.
Quick check
Museum shirts have slits about 5 cm long.
Try it
Before sewing the real gusset, sew one into a paper sleeve-and-body mockup with tape. Turning the square on point and seeing how its four edges meet four seams makes the machine work easy.
Lesson complete
Nice work.
Sources for this lesson
- 1Sew Your Own Scandinavian Work Shirt. North House Folk School. verified5 days; instructor Caroline Feyling (earlier Carol Colburn). The busserull cut has been tried and true for close to 200 years, designed for full movement in blacksmithing, gardening, fishing, forestry. Bring about 3 yards of all-natural woven cotton or cotton/linen, 5-6 buttons, thread, hand-sewing kit; six pattern sizes; suited to advanced beginners.
- 2busserull (UMUIT-E N2646). UiT Norges arktiske universitetsmuseum, DigitaltMuseum. verifiedDoubled yoke, neckband, wide placket with 3 buttons; sleeves pleated 2 front and 2 back at the top and 6 at the wrist into a narrow one-button cuff; gusset cut in one with the sleeve front; short side slits; back length about 76 cm, back width 57 cm, sleeve about 54 cm.
- 3149 Norwegian Busserull (pattern) and Making the Norwegian Busserull, parts one and two. Folkwear. 2026. verifiedSizes XS-3XL; rectangles and squares, underarm gussets, buttoned placket, optional half belt. Yardage on 45-inch fabric: XS-S 2 1/8 yd, M 2 3/4, L 2 7/8, XL-3XL 3 1/2; on 60-inch: XS-M 1 3/4, L-XL 2 1/8, 2XL-3XL 2 1/4. Finished chest 48 3/4 to 72 in; back length 26 1/2 to 29 in. Six 1/2-inch buttons; optional two 1-inch D-rings. Blog (folkwear.com/blogs/news/making-the-149-norwegian-busserull and .../making-the-norwegian-busserull-part-two): lined yoke with lining edges pressed under 1/2 inch and edge-stitched; neck stay-stitched at 3/8 inch; slash center front, underplacket and placket at 3/4 inch with box-stitched tab; collar band interfaced on one half, inside slipstitched by hand; four pleats at each sleeve's cuff end; gussets to sleeves, sleeves to body; optional back belt; side seams through the gussets; narrow-hemmed sleeve slits; cuffs whipstitched inside; hem 1/4 inch turned twice; buttonholes and buttons.
- 4Busserull (Lands Museum). Lands Museum, DigitaltMuseum. verifiedPlain-woven cotton, warp 4 blue threads to 2 white; underarm gusset 9 x 9 cm; side slit 5 cm.
- 5Busserull (Hadeland Folkemuseum). Hadeland Folkemuseum, DigitaltMuseum. verifiedTwill-woven striped cotton; poncho cut with the body from one length of cloth; shoulder piece (akslaug) about 22 cm wide with stripes the same way as the body; straight-set sleeves with underarm gusset, pleated into a one-button cuff; neck placket; side slits; back strap.