Hand Caning: The Seven Steps
Reseating a chair with holes around the opening: what rattan cane is, choosing the size from hole spacing, soaking, the seven steps from first verticals to binder, fish-heads at the corners, tying off underneath, and fitting irregular and round seats.
- 5 min
- 6 steps
- 4 questions
- Lesson 76 of 204
In this lesson
- The material
- Choosing cane
- Preparing
- The seven steps
- Other shapes
- Care
Picking up where you left off.
The material
Seating cane is the glossy outer bark of rattan, a climbing palm of Southeast Asia whose stems grow 100-300 feet long and rarely more than an inch thick, stripped into narrow strands 1. It isn’t bamboo or sugar cane. Good cane is smooth, glossy on the right side, tough, and pliable, with smooth, unbroken “eyes” where leaves grew 1. Plastic cane exists; real cane is the choice for old chairs 1.
A chair with a ring of small holes drilled around the seat opening takes hand caning; one with a groove takes pressed cane (next lesson) 1.
Choosing cane
Measure hole spacing center to center 1:
| Cane size | Hole diameter | Hole spacing |
|---|---|---|
| Superfine | 3/16 in. | 3/8 in. |
| Fine fine | 3/16 in. | 1/2 in. |
| Fine | 3/16 in. | 5/8 in. |
| Narrow medium | 3/16 in. | 3/4 in. |
| Medium | 1/4 in. | 3/4 in. |
| Common | 5/16 in. | 7/8 in. |
Binder is cane one width wider than the weaving cane, used to finish the edge 1. A 1,000-foot hank does about four medium chairs.
Quick check
Cornell’s guide: superfine 3/8, fine-fine 1/2, fine 5/8, medium 3/4, common 7/8 inch spacing.
Preparing
- Cut out the old seat with a keyhole saw or shears, saving it as a guide; clear every hole; round the inside edge of the frame with a file so it won’t cut the cane; refinish before caning 1.
- Soak a coil of cane, smooth side out, about 20 minutes in warm water until pliable; Cornell recommends a 10 percent glycerine solution to keep it supple 1. Keep the next strand soaking while you work.
- Tools: two dozen wooden pegs, an awl, scissors, a clamp clothespin or two, a sponge.
- Weave with the eye so the bumps don’t catch and roughen 1.
The seven steps
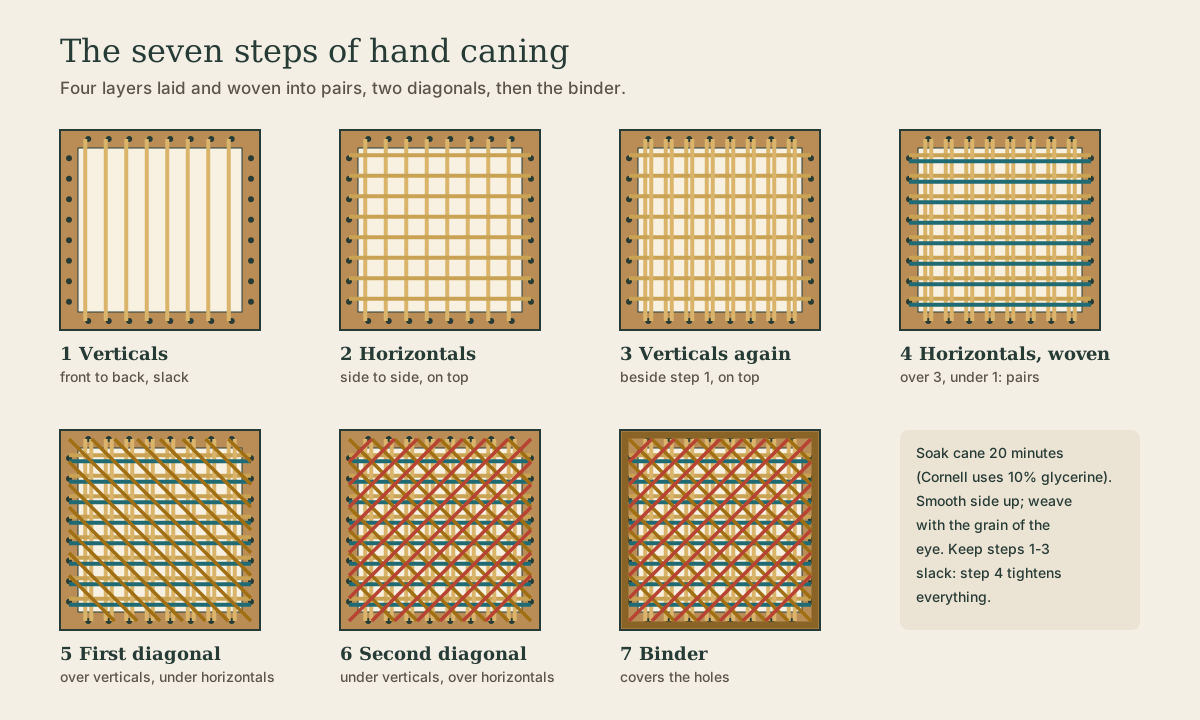
Weave from the top of the seat, starting at the center of the back rail so rows stay straight 1 2:
- Verticals, front to back. Peg the center holes front and back, then lay strands back and forth, slack - sagging a little below the frame 1. On seats wider at the front, use extra strands in the side holes.
- Horizontals, side to side, laid on top of step 1.
- Verticals again, on top, just to the right of the step 1 strands.
- Horizontals, woven. The first real weaving: over the step 3 strands and under step 1, in front of the step 2 rows, drawing everything into pairs with small open squares between. Wet the seat and straighten the pairs with pegs or an awl 1.
- First diagonal, from a back corner: over the vertical pairs, under the horizontal pairs. Corner holes take two strands, a fish-head (V); skip or double holes on curved sides to keep rows straight 1.
- Second diagonal, the opposite direction: under the verticals, over the horizontals 1.
- Binder: lay the wider binder over the holes and stitch it down with weaving cane, up and over and down through each hole (or every other hole when they’re close), pegging the ends at the corners 1.
Tying off: twist or tie ends around a nearby strand underneath, never carrying cane across a hole that’s still needed 1. When the seat dries, the mesh tightens and should follow the shape of the frame.
Pull strands through with your hand level with the rail; lifting can saw through strands already woven 1. If the cane squeaks it’s too wet; if it cracks, wet it 1.
Playback is optional. If the player is unavailable, open the video at its source.
Quick check
Steps 1-3 are laid on top of each other; step 4 weaves through and draws the strands into pairs.
Quick check
Corners take two diagonals so the pattern stays straight.
Quick check
Cornell says to let the cane sag a little below the frame level in the early steps.
Other shapes
- Round seats: usually fine cane and lots of doubling in holes; some weavers do a diagonal as step 3 to hold rows straight 1.
- Five-step weaving skips one vertical and one horizontal step; quicker but weaker 1 2.
- Rocker backs: same steps, with more ends to hide at the lower edge.
The Caner’s Handbook covers repairs and restoration of antique cane in detail 3.
Care
Clean with a damp cloth; dampening the underside now and then keeps cane from drying brittle. Natural cane is usually left unfinished.
What to take from this
Hand caning uses rattan cane sized by hole spacing (fine for 5/8 in., medium for 3/4 in.) and soaked about 20 minutes. Lay verticals, horizontals, and verticals again slack; weave the second horizontals over and under into pairs; add two diagonals with fish-heads at the corners; then stitch on a wider binder. Tie off underneath without crossing open holes, and pull level with the rail.
Lesson complete
Nice work.
Sources for this lesson
- 1Ruth B. Comstock, Clark E. Garner. Cane Seats for Chairs (Cornell Bulletin 681, revised edition). Cornell Cooperative Extension. verifiedExtension bulletin on rattan cane, cane size by hole size and spacing, soaking in 10 percent glycerine, seven-step weaving with fish-heads at corners, binder, five-step weaving, and prewoven cane with splines.
- 2L. Day Perry. Seat Weaving. The Manual Arts Press. 1917. verifiedPublic-domain manual on the seven steps of caning, cane webbing, rush seating (cattail and flag gathered in August, twisted strands, stuffing, filling rectangular and irregular seats), and reed and splint seats.
- 3Jim Widess, Bruce W. Miller III. The Caner's Handbook: Restoring Cane, Rush, Splint, Danish Cord, Rawhide, and Wicker Furniture. Schiffer Publishing. verifiedCurrent publisher page for the updated illustrated handbook covering rush, splint, Danish cord, rawhide, wicker, repair, and maintenance.