Raising, Hoops, the Croze, and the Bottom
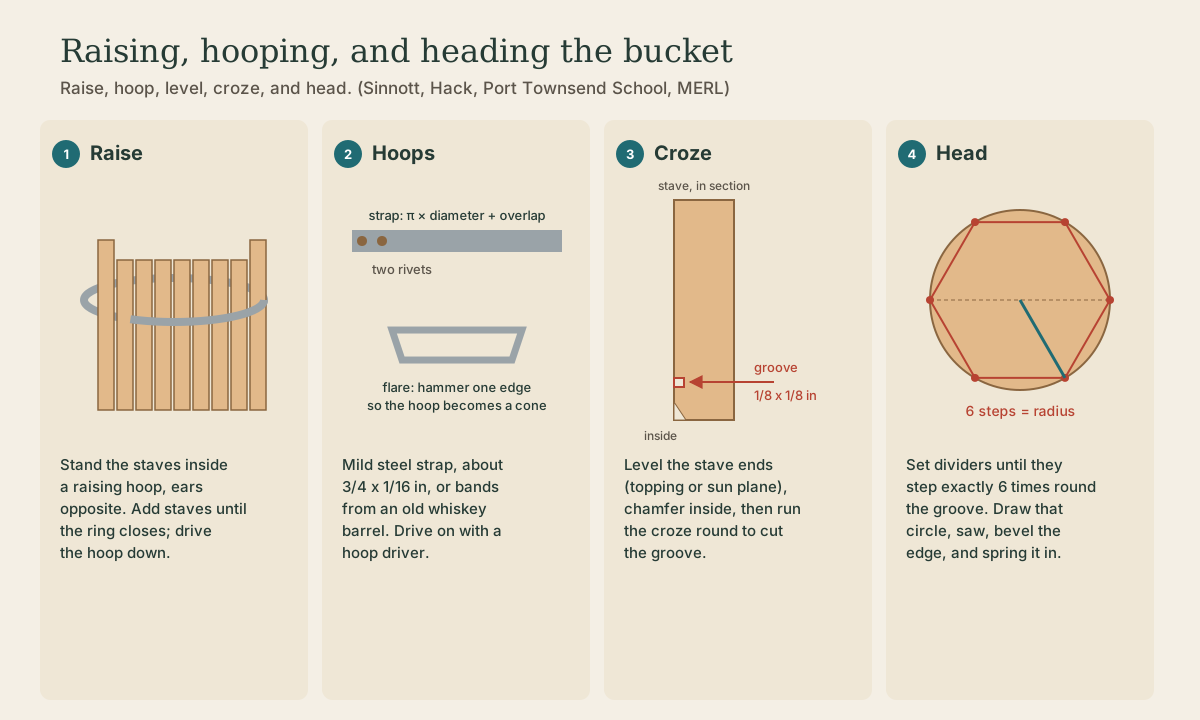
Days two through four: raise the staves inside a hoop, make conical steel hoops by measuring, riveting, and flaring, clean the inside, level the ends and cut the croze groove, find the bottom's radius by stepping dividers six times around the groove, then fit the bottom, drive the hoops tight, add the handle, and soak-test.
- 5 min
- 7 steps
- 2 questions
- Lesson 138 of 204
In this lesson
- Raise the bucket
- Make the hoops
- Clean the inside
- Level the ends and cut the croze
- The bottom
- Handle and test
- Try it
Picking up where you left off.
Raise the bucket
Port Townsend’s class shapes and bevels the staves, then rough-assembles the bucket before making the bands 1. Raising is that rough assembly:
- Stand the two ear staves opposite each other inside a raising hoop, a temporary hoop slightly bigger than the bucket.
- Add staves on both sides, bottoms down, holding them against the hoop with your hand or a strap.
- When the gap left is smaller than a stave, plane the last stave narrower to fit. Fross’s class expected the last stave to be narrower 2.
- Tap the hoop down with a hoop driver until the joints close.
If a joint gaps inside or outside, the bevel on that edge is wrong: take the stave out and fix it on the jointer.
Make the hoops
The bucket is a cone, so its hoops must be cones too. Sinnott’s hoops “start life flat”: rivet them, then hammer them on the inside to flare them out 3. Metal hoops usually carry two rivets and are tapered to fit the staves 4.
- Measure. Mark where each hoop will sit: the bottom hoop about an inch above the bottom, over the groove; the top hoop about two-thirds of the way up. Wrap a strip of paper around the bucket at each mark.
- Cut. Cut the steel strap to that length plus about 1 1/2 inches of overlap.
- Rivet. Drill two 1/8-inch holes through the overlap, set the rivets, and peen them over on the steel block.
- Flare. Hold the hoop on the anvil horn or a steel post and hammer along one edge, all the way round. Hammering thins and stretches that edge, so the hoop becomes a cone. Try it on the bucket often; stop when it seats along its full width.
- Drive. Set the hoop on the bucket and drive it down evenly with the hoop driver, working round the hoop.
Drive the bottom hoop last and hardest, since it holds the bottom.
Quick check
Sinnott’s hoops start flat, are riveted, then hammered on the inside to flare.
Level the ends and cut the croze
- Level. Plane the stave ends flat across the top and bottom with a topping (sun) plane 3. The croze rides on these ends, so the bottom end must be flat and square to the bucket.
- Chamfer. Bevel the inside edge of the bottom end, the chime. On casks the chime protects the short grain where the head sits in its groove 5.
- Croze. Run the croze around the inside to cut the groove for the bottom. Sinnott’s cuts a groove about 1/8 inch wide and 1/8 inch deep with two nickers and a router-like tooth 3. On casks a howel first cuts a shallow hollow so the croze has a level place to cut 5; a bucket’s thin walls rarely need it.
Set the groove about 3/4 inch up from the bottom end. One maker cut the groove before assembly with a dado blade 6, but cutting it after raising keeps it level.
The bottom
Coopers’ dividers are made “for measuring and marking out the heads of barrels” 7. The method is pure geometry: a chord equal to a circle’s radius spans 60 degrees, so a dividers setting that steps exactly six times around a circle is its radius.
- Find the radius. Set the dividers to a guess, step them around the bottom of the groove, and adjust until the sixth step lands on the starting point.
- Make the blank. Join two or three boards edge to edge. Coopers dowel head boards together 5.
- Draw and cut. Draw the circle with the dividers on that setting. Saw just outside the line.
- Bevel the edge. Plane or knife the edge down on both faces to a thin edge that fits the groove; heads are cut “to a fine bevel” to fit snugly 5.
- Fit it. Tap the bottom hoop up a little to let the staves spread, tip the bottom into the groove on one side, and press it in all round. Drive the hoops back down hard.
One maker packed the groove with oakum before fitting the bottom 6. With a tight croze and cedar, swelling usually seals it.
Playback is optional. If the player is unavailable, open the video at its source.
Quick check
That is why a compass set to a circle’s radius steps a hexagon around it.
Handle and test
Bore a 3/4-inch hole through each ear stave, about 1 1/2 inches below the top, pass a rope through, and knot it inside each ear. Fill the bucket with water. Small weeps usually close as the cedar swells overnight; Fross’s class bucket counted on it 2. A steady leak means a gap at a joint or the groove: drive the hoops tighter before anything else.
Try it
Before crozing the bucket, step the dividers six times around a circle drawn on paper and see how small an error shows up at the sixth step. A sixth of the error is what your bottom will be off.
Lesson complete
Nice work.
Sources for this lesson
- 1Coopered Bucket. Port Townsend School of Woodworking. verifiedTwo-day class with Steve Habersetzer, Douglas fir or other salvaged old-growth softwood: shape staves with a hatchet, bevel on a cooper's plane, rough-assemble, measure and make the iron bands and hammer them to flare, clean the inside with a scorp, make the base with bandsaw and hand plane, fit it and drive on the bands. $450 plus $100 materials, Aug 29-30, 2026.
- 2Michael Fross. Finally knocked a project off the bucket list.... Sawmill Creek Woodworking Community. 2016. verifiedA two-day cedar pail class with a croze and a Nantucket driver. Staves may differ in width; what matters is that both edge angles point at the bucket's center, checked with two wooden arms hinged with leather and marked in inches, set at the bucket's radius. Recommends James Gaster's How to Make a Coopered Wooden Bucket.
- 3Dean Sinnott. My Coopering Toolkit. Southern Alberta Woodworkers Society. 2021. verifiedFrom a Port Townsend coopering class: tapered stave templates, wider at the open end; side bevels on a 5-ft cooper's plane fitted with Stanley No. 8 works; a sector marked in bucket radius sets and checks the bevels; hoops from recycled whiskey-barrel bands, riveted flat then hammered on the inside to flare; hoop drivers; a scorp for the inside; a croze with two nickers cutting a groove about 1/8 in wide and deep; a sun (topping) plane levels the ends; bottom turned to fit the groove.
- 4Coopered Buckets Hoops. Permies. verifiedBryant RedHawk: coopers make their own hoops; metal hoops from 20 gauge to 3/16 in thick depending on size, usually two rivets each, tapered to fit the staves; he forges 1070 mild steel to fit, and pulls the staves together for hooping with an adjustable ring and rope or strap clamps.
- 5Garrett Hack. Cooper's Planes. Fine Woodworking. 2021. verifiedPails and churns are 'white coopering.' Staves tapered and beveled by eye on a long jointer used upside down with the toe raised. Ends leveled with a topping plane (a curved jack); the howel cuts a shallow hollow and the croze a narrow groove for the head, both riding on large round fences; heads of two or three boards doweled together, edges cut to a fine bevel to fit the groove; inside smoothed with an inshave or stoup plane; hoops of wood or steel.
- 6Coopering: Making a Bucket. Woodworkers' Apprentice. 2010. verifiedWhite oak buckets with machine help: boards planed to 3/4 in, 14 short staves and 2 longer handle staves, a 1/2-in groove for the base, beveled edges, staves rounded on the shaving horse; oakum in the groove before fitting the base; tapered iron bands from a local blacksmith.
- 7Dividers (TOS0703). National Maritime Museum, Greenwich. verifiedSteel cooper's dividers, 335 mm, 'for measuring and marking out the heads of barrels.'