Sharpening, Setting, and Using the Saw
Day four: keep the saw cutting. Joint the teeth level, shape them even, set them so the kerf clears the blade, and file them to a rip or crosscut geometry with the right file for the tooth size. Then how to saw with a frame saw, and how to care for it between uses.
- 3 min
- 6 steps
- 2 questions
- Lesson 144 of 204
In this lesson
- The four steps
- Rip or crosscut
- Choosing a file
- Sawing with it
- Care
- Try it
Picking up where you left off.
What you need
Tools
Checkmarks are saved on this device.
North House’s class spends time on sharpening and maintaining the blade 1. With a resharpenable blade, a frame saw lasts a lifetime.
The four steps
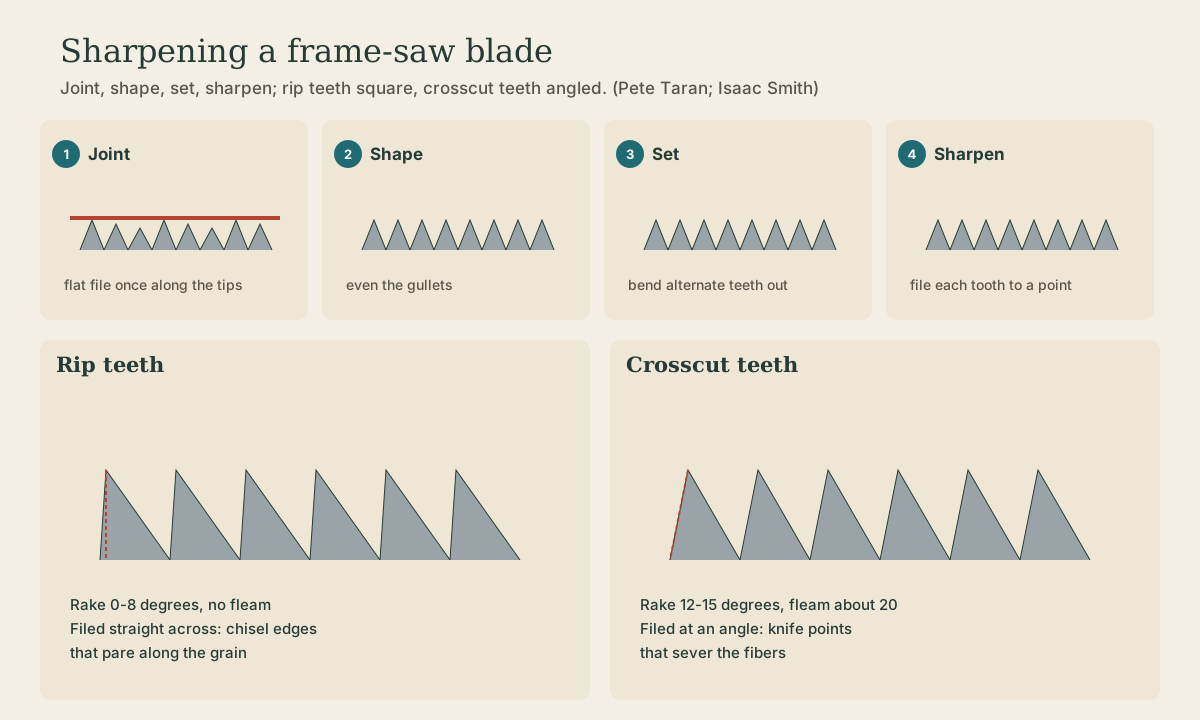
Clamp the blade in a saw vise with the teeth just above the jaws, and work in this order 2:
- Joint. Run a flat mill file once along the tops of the teeth so they’re all the same height. Color the tips with a marker first; every tooth should show a small shiny flat.
- Shape. File each gullet until all the teeth are the same size and the flats are nearly gone.
- Set. Bend alternate teeth outward slightly with a saw set, one side, then the other, so the cut is a little wider than the blade.
- Sharpen. File each tooth to a point, removing the last of the flats.
Quick check
Jointing levels the teeth so shaping and filing make them even.
Rip or crosscut
The tooth shape depends on the job 2:
- Rip (along the grain): rake 0 to 8 degrees (8 is easier for beginners) and no fleam: file straight across, square to the blade, so each tooth is a tiny chisel.
- Crosscut (across the grain): rake 12 to 15 degrees and fleam about 20 degrees: angle the file across the blade, so each tooth is a tiny knife that severs fibers.
Norwegian museum saws include both rip-toothed and symmetric crosscut-toothed blades, many with teeth raked to cut on the push stroke 3.
Quick check
Rip teeth chisel along the grain; crosscut teeth knife across it.
Choosing a file
The file must fit the teeth. Pete Taran’s sizes: a 6-inch regular taper file for 5 to 5 1/2 points per inch, a 7-inch slim for 6 to 7, a 6-inch slim for 8, and a 6-inch extra-slim for 9 to 10 2. Blackburn’s 7-ppi blade takes a 7-inch slim 4.
Playback is optional. If the player is unavailable, open the video at its source.
Sawing with it
Hold a frame saw by one handle with the blade vertical, or with both hands for heavy ripping, and let the weight and length of the stroke do the work. Turn the handles to angle the blade when the frame would hit the work on a long rip. Start the cut gently against a thumb or a guide block, then use long, even strokes.
Care
Wipe the blade after use and keep it lightly oiled against rust. Check the tension each time you pick it up; cord stretches and slackens with humidity. When the saw starts to drift or needs pushing, it’s time to joint and touch up the teeth.
Try it
Joint and touch up your new blade even if it came sharp. Doing it once on a sharp blade, when you can see the original geometry, is the easiest way to learn it.
Lesson complete
Nice work.
Sources for this lesson
- 1Traditional Tools: Frame Saws. North House Folk School. verifiedFour days (May 9-12, 2027), instructor Roald Renmælmo; tuition $495, materials $180. Students make an old Norwegian-style frame saw of pine and birch shaped with traditional hand tools, with a custom blade from Verktøysmia in Norway, and learn to sharpen and maintain it. Required tools: hand plane, 1 in and 1/2 in chisels, mallet, sloyd knife, mortise gauge, fine saw; optional saw-sharpening tools, turning chisel, 5/8 and 3/4 in bits, sharpening kit, scraper.
- 2Pete Taran. Saw Sharpening. Vintage Saws. verifiedJoint with a mill file in one pass, then shape, then set, then sharpen. Rip: rake 0-8 degrees (8 for beginners), no fleam. Crosscut: rake 12-15 degrees, fleam 20 degrees (15 above 12 ppi). Files: 5-5.5 ppi 6 in regular taper; 6-7 ppi 7 in slim; 8 ppi 6 in slim; 9-10 ppi 6 in extra-slim.
- 3Sag (frame saw SJF.14035). Norsk Skogmuseum, DigitaltMuseum. verifiedStretcher 87.3 cm, 3.9 x 2.6 cm, knot-free pine; birch arms 45 cm; blade 3.3 cm wide with raked teeth about 4 mm apart; octagonal handles; toggle 25.5 cm; stretcher ends sit in mortises in the arms. Twisting the cord with the toggle draws the arm tops together and pushes the bottoms apart, tensioning the blade. Other museum saws: stretchers 65-97 cm, arms 32-45 cm, blades 2.5-3.6 cm wide, about 60-70 cm toothed length, rip teeth about 5-7 tpi and finer blades 8-10 tpi.
- 4Danish Frame Saw Parts. Blackburn Tools (Isaac Smith). verified1095 spring-steel frame-saw blades, 3/16 in holes: 1 1/4 x 16 in x 0.025 in, 9 ppi, for tenons and ripping to 1 1/2 in ($17 unsharpened, $51 sharpened); 1 1/4 x 24 in x 0.028 in, 7 ppi, for large tenons and ripping to 3 in ($21, $56). Stainless blade holders, bolts and pins $15; braided cord; suggests arms of elm, ash, hickory, or beech and a stretcher of pine, cedar, or basswood.