Dyeing and Finishing
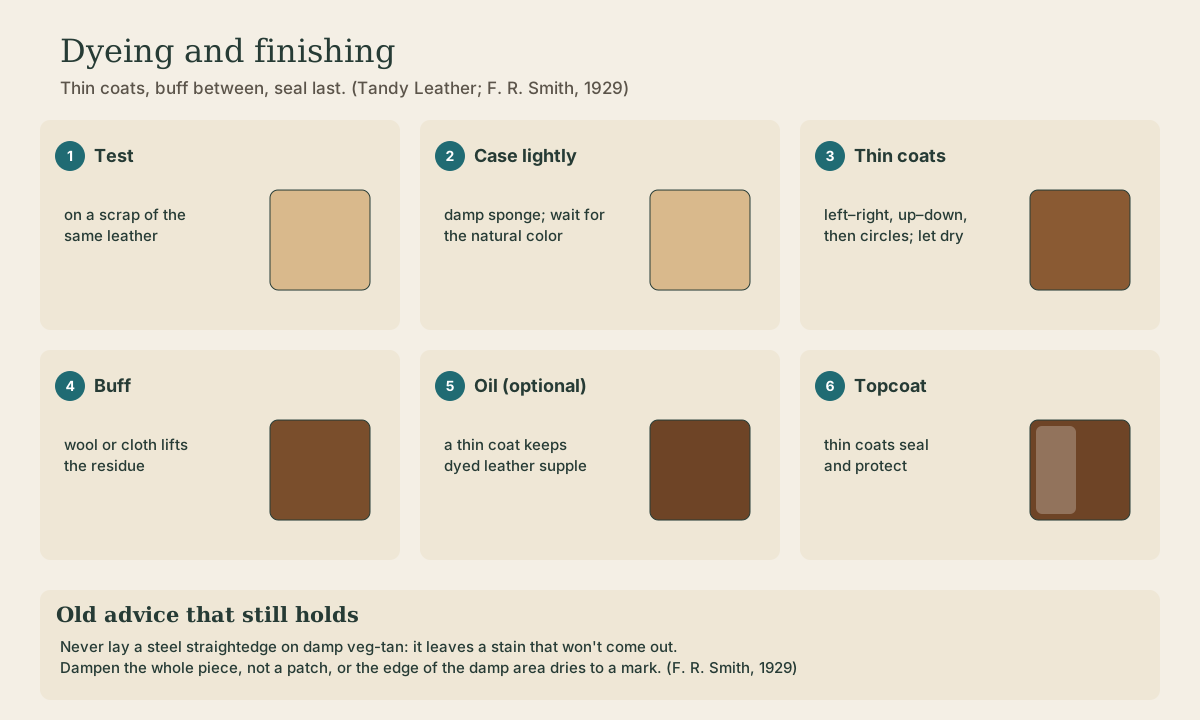
Vegetable-tanned leather starts pale and takes dye beautifully, but blotchy, streaky color is the most common beginner disappointment. The fixes: test on scrap, case the leather lightly so it absorbs evenly, build color in several thin coats in alternating directions, buff off the residue, oil it if it feels stiff, and seal it with a topcoat.
- 3 min
- 5 steps
- 2 questions
- Lesson 102 of 204
In this lesson
- Prepare
- Build the color
- Seal it
- Try it
Picking up where you left off.
Dyeing is where a project gets its character, and also where it most often goes wrong. Almost every problem traces to too much dye at once on leather that wasn’t ready.
Prepare
- Test first on a scrap of the same leather. Alcohol- and water-based dyes behave differently, and the color in the bottle isn’t the color on the leather 1.
- Clean the surface by buffing it to remove debris 1.
- Case lightly. Dampen the surface with a sponge or sprayer so it absorbs dye evenly. If you overdo it, wait until it returns to its natural color and feels cool to the touch 1. The 1929 textbook’s rule applies: dampen the whole piece, not a patch, or the patch edge dries to a mark 2.
- Protect yourself and the bench: dye stains everything. Wear gloves, cover the work surface, ventilate, and keep the project out of direct sun and heat 1.
Quick check
If you oversaturate it, wait until it returns to its natural color.
Build the color
Apply dye with a wool dauber, a sponge, or a brush. Tandy’s pattern: the first layer left to right, the second up and down, the third in circles, letting each coat dry thoroughly. Several thin coats give a more even color than one heavy one 1. Sponges cover large areas quickly; brushes are good for edges and small areas but leave strokes on big ones 1. Dip-dyeing, dipping the piece quickly into a container of dye (full strength or diluted) and wiping it off, gives an even coat in one go 1.
After the last coat dries, buff with sheepskin, a cloth, or a paper towel to remove the residue and polish the surface 1. Let dyed leather dry at least 24 hours; if it feels stiff, rub in a thin coat of oil and buff again 1.
.jpg)
Quick check
Then buff off the residue.
Seal it
A topcoat seals the leather, deepens the color, and adds water resistance; it can also act as a resist before an antique finish. Finishes come in gloss, satin, and matte 3. Make sure the leather is completely dry, buff it, test the finish on scrap, and apply thin coats with the same left-right, up-down, circular pattern. Ventilate when using acrylic finishes; a hair dryer on low pops any bubbles 3.
Playback is optional. If the player is unavailable, open the video at its source.
Try it
Cut three scraps of the same veg-tan. Dye one with a single heavy coat, one with three thin coats in alternating directions, and leave one natural. Topcoat all three. The comparison will teach you more than any instructions.
Lesson complete
Nice work.
Sources for this lesson
- 1Tandy Skills: Dyeing Tutorial. Tandy Leather. verifiedTest alcohol- or water-based dye on scrap; buff the surface; lightly case (dampen) for even absorption, letting oversaturated leather return to its natural color; ventilate, cover the bench, wear gloves; keep out of sun and heat. Apply with brush, wool dauber, or sponge: left to right, then up and down, then circles; several thin coats, each dried; or dip-dye. Buff off residue with sheepskin or cloth. Let dry 24 hours; optionally rub in a thin coat of oil to keep the leather from stiffening before finishing.
- 2F. R. Smith. Practical Leatherwork: A Textbook for Students and Craft Workers. Sir Isaac Pitman & Sons, London. 1929. verifiedBritish art-leather manual: leathers (Persians, skivers, calf, modelling hide), tools, thonging, sewing, press fittings, modelled leather. Glossary: skiving is (a) splitting a skin horizontally into thicknesses or (b) beveling an edge by paring; skived joints are almost invisible. Never use a steel straight-edge on modelling leather: the stain cannot be removed. Damp the leather all over, since a small damped patch dries leaving a stain at its edge; transfer designs through tracing paper with a hard pencil rather than carbon paper. Beginners' modelling tools: broad modeller and double-ended Dresden.
- 3Tandy Skills: Applying Finish to Leather Tutorial. Tandy Leather. verifiedA topcoat seals leather and brings out color; used as a water-resistant coat, as a resist before antique stain, to highlight. Gloss, satin, matte. Test on scrap; buff first; leather must be completely dry; ventilate for acrylic finishes. Thin coats with brush, dauber, sponge, or paper towel in the same left-right, up-down, circular pattern; low hair-dryer heat pops bubbles.