The Wood-Lined Leather Sheath
Days three and four: make a three-layer wooden liner that grips the blade, wet-form vegetable-tanned leather over knife and liner, stitch the back seam from the tip, decorate the leather, and make the one-piece braided hanger capped with antler or wood. Dyeing, oiling, and burnishing.
- 3 min
- 7 steps
- 2 questions
- Lesson 165 of 204
In this lesson
- The liner
- Pattern
- Mold and stitch
- Decorate
- The braided hanger
- Dye and finish
- Try it
Picking up where you left off.
The liner
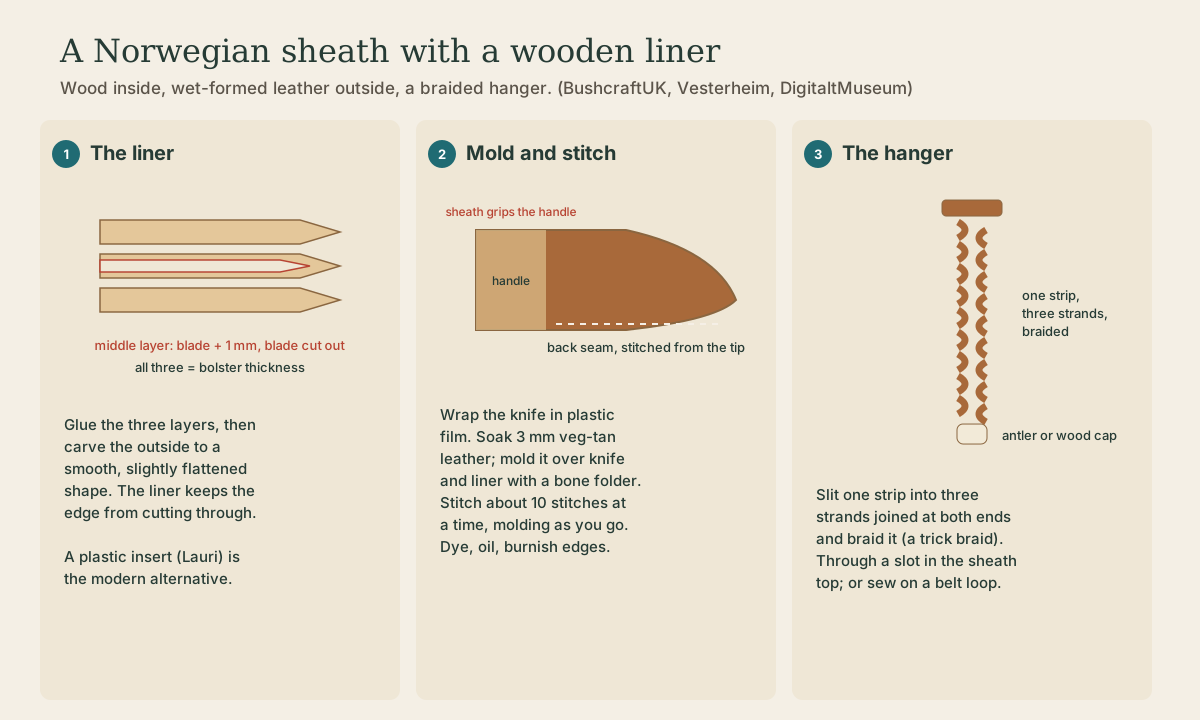
Johnson’s sheath is “constructed of wood” and leather 1. A sheath maker’s version 2:
- Cut three thin layers of pine.
- Make the middle layer about 1 mm thicker than the blade and cut the blade’s outline out of it.
- Make the three layers together as thick as the bolster, so the sheath’s mouth fits the bolster.
- Glue them, then carve the outside to a smooth, slightly flattened shape.
A Lauri plastic insert is the quick alternative 3.
Quick check
The blade slides into the cut-out with a little room; all three layers together equal the bolster.
Pattern
Lay the knife and liner on paper and draw a pattern that wraps around both, with a seam allowance along the back edge. Norwegian sheaths are deep: an 1899 knife measures 21 cm sheathed though the knife is 17.5 cm and the sheath 15 cm, so the sheath covers several centimeters of the handle 4. Bring the pattern up over the lower part of the handle; the leather will grip it by friction.
Mold and stitch
- Wrap the knife in plastic film 2.
- Soak vegetable-tanned leather until it is limp. Groven’s class uses vegetable-tanned leather 5; Johnson’s uses what the class calls German half-tanned leather 1.
- Wrap the leather around knife and liner and mold it with a bone folder, pressing it into the shapes of the handle and bolster 2.
- Stitch the back seam starting at the tip, about ten stitches at a time, molding as you go 2. Use two needles and waxed linen in a saddle stitch.
- Let it dry on the knife.
Quick check
Starting at the tip lets you pull the wet leather tight around the knife as you work up.
Decorate
Norwegian sheaths were carved, stamped, or embossed 6; the Telemark knife by Hallstein Kroken Midbø has a thick, ornamented dark-brown sheath 7. Groven’s class makes its own leather modeling (pauting) tool and explores decoration and finishes 5. Model or stamp the leather while it’s still damp.
The braided hanger
Johnson’s sheath includes “one piece of leather braided and capped with antler or wood” 1. A likely reading is a trick braid: slit one strip of leather into three strands still joined at both ends and braid them, which can be done without cutting the ends free. Pass it through a slot at the top of the sheath and finish the loose end with an antler or wood cap or toggle. Groven’s sheath has a belt hoop or none 5.
Dye and finish
Punch the hanger slot, trim the edges, dye, apply an oil and wax mix, and burnish the edges 2. The whole sheath took that maker about three hours.
Playback is optional. If the player is unavailable, open the video at its source.
Try it
Before cutting your good leather, mold a scrap of the same leather around the knife and liner and let it dry. It shows how far the leather stretches and how much seam allowance you need.
Lesson complete
Nice work.
Sources for this lesson
- 1Making a Norwegian Brukskniv with Wood and Leather Sheath. Vesterheim Folk Art School. verifiedScott Johnson, July 18-21, 2026, intermediate to advanced; a Norwegian work knife whose sheath 'will be constructed of wood and German leather (half tanned) and will include one piece of leather braided and capped with antler or wood.' Prerequisite: some experience making a knife and sheath.
- 2Scandi style sheath step by step. BushcraftUK. 2012. verifiedLiner of three pine layers, the middle 1 mm thicker than the blade with the blade profile cut out, total thickness equal to the bolster; glue and carve. Wrap the knife in cling film, soak the leather, form over knife and liner with a bone folder; stitch from the tip about 10 stitches at a time, molding as you go; punch for a thong belt loop, trim, dye, oil-wax, burnish; about 3 hours.
- 3Sheath Inserts. Ragweed Forge. verifiedLauri plastic sheath inserts, $1-2.50, e.g. 110 x 24 mm for blades up to 110 mm long and 24 mm wide.
- 4Kniv med slire (KVB.0283). DigitaltMuseum. verified1899: knife 17.5 cm, sheath 15 cm, 21 cm overall sheathed, so the sheath covers part of the handle; leather loop with a buttonhole on the back.
- 5Beginner Knifemaking and Hand Tools. Vesterheim Folk Art School. verifiedKJ Groven, Nov 13-15, 2026, beginner friendly, $290/$320: hand-carve a handle on a pre-made blade, without power tools, 'more of a knife for carving than a fancy belt knife'; a traditional Norwegian sheath of vegetable-tanned leather, with or without a belt hoop; make an awl, a leather modeling (pauting) tool, and two tang saws, one from scratch with push-and-pull teeth. No forging.
- 6Audun Dybdahl, Eivind Falk. Kniv - tradisjonell bruk. Store norske leksikon. 2026. verifiedBlade parts: tang, grinding bevel, edge, spine; traditionally soft steel forged around a hard edge steel. Handles fixed with glue or rivets; of wood, horn, bone, birch bark, leather, or metal, with metal bands at the ends. Sheaths usually leather, carved, stamped, or embossed; centers at Tinn, Toten, and Gjerstad.
- 7Kniv med slire (SJF.02197). Norsk Folkemuseum (DigitaltMuseum). verifiedTelemark, by Hallstein Kroken Midbø, Børtegrend: knife 20 cm, blade 9.1 cm, sheath 25.7 cm; curly (masur) birch handle; thick dark-brown ornamented leather sheath.