The Oslo Stitch
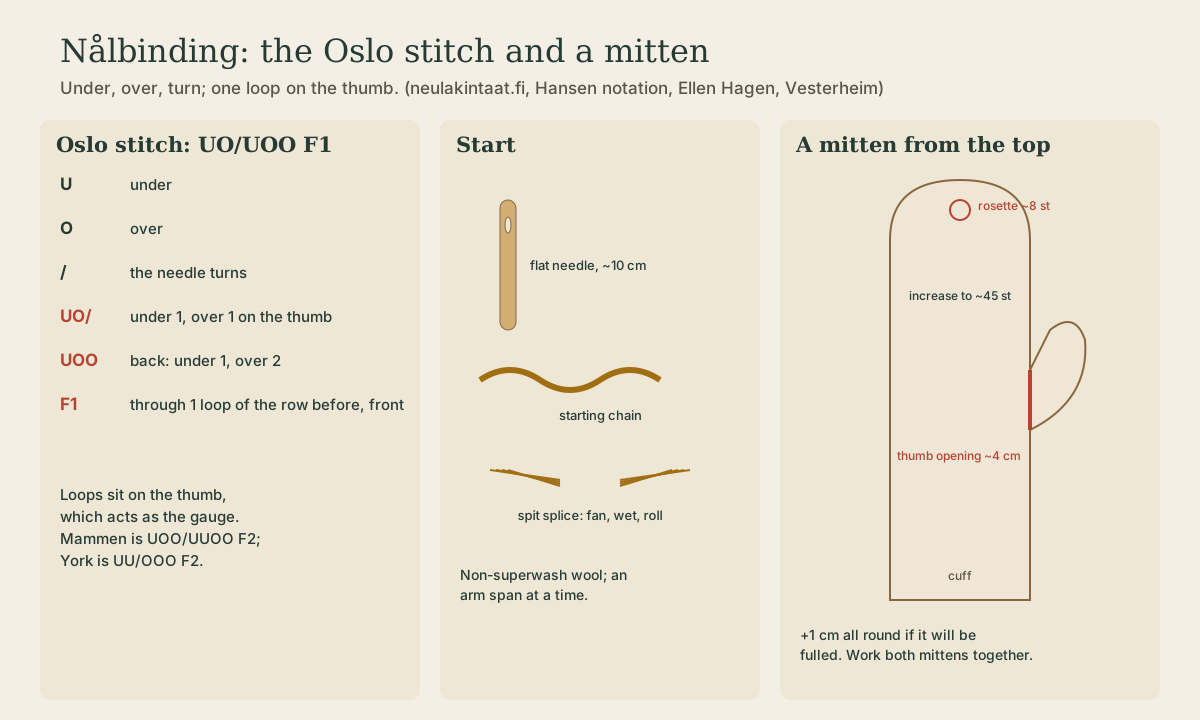
Day one: read Hansen notation, make the thumb-loop start, work the Oslo stitch (UO/UOO F1) into a chain, join new yarn by spit splicing, close a ring, and work rows connected to the row before, with increases and decreases.
- 2 min
- 5 steps
- 2 questions
- Lesson 199 of 204
In this lesson
- Reading the notation
- The start and the chain
- Spit splicing
- In the round
- Try it
Picking up where you left off.
Reading the notation
Stitches are written in Hansen notation, published by Egon Hansen in 1987: U is under, O is over, and / is where the needle turns. The Oslo stitch is UO/UOO F1: one loop stays on the thumb and one is picked up on the needle, and F1 means each stitch also passes through one loop of the row before, from the front. Mammen is UOO/UUOO F2 1.
Quick check
U is under, O is over; F1 means the stitch also connects to one loop of the previous row from the front.
The start and the chain
- Thread about an arm span of wool 2.
- Make a loop around your left thumb, the needle end hanging toward you.
- Pass the needle under the thumb loop, turn it, and pass under the next loop and the free strand; pull through so a new loop falls on the thumb.
- Slip the old thumb loop off; it becomes the loop you pick up next. Repeat to build a chain.
The loops sit on the thumb, which acts as the gauge, so keep them the same size. Schmitt says getting the motion takes anywhere from “20 minutes to two-and-a-half days” 2.
Playback is optional. If the player is unavailable, open the video at its source.
Quick check
That’s why the wool can’t be superwash.
In the round
Join the chain into a ring and keep going, now passing through one loop of the previous row from the front on every stitch (the F1). Increase by working two stitches into one loop of the row below; decrease by picking up two loops at once 1. To leave an opening for a thumb or heel, “simply jump over a row or area” 4.
Try it
Make a ring about 20 stitches around and work five rows on it. Measure it after each row; if it grows or shrinks without increases, your thumb loops are changing size.
Lesson complete
Nice work.
Sources for this lesson
- 1Sanna-Mari Pihlajapiha. Needles for nålbinding. Neulakintaat.fi. verifiedFinnish needles usually 8-12 cm long (old ones up to 15), about the length of a forefinger, 0.4-1 cm wide, edge 2-3 mm; juniper, lilac, rowan, and other woods. The same site explains Hansen notation, published by Egon Hansen in NESAT III in 1987 (U under, O over, / needle turns; Oslo UO/UOO F1, Mammen UOO/UUOO F2), spit splicing (fan the plies 2-3 cm, moisten, roll 10-20 seconds; superwash won't felt), and mittens started at the top with a rosette of about 8 stitches in thick yarn, increased to about 45, a thumb opening about 4 cm, and 1 cm added all round for fulling.
- 2Linda Falkenstein. A stitch in time. Isthmus (Madison). 2020. verifiedLarry Schmitt's classes start with whittling a needle; yarn about an arm span long; getting the motion takes '20 minutes to two-and-a-half days'; spit-splice 100% wool.
- 3Nålbindning. Swedish Wikipedia. verifiedA flat needle about 10 cm; yarn must not be superwash, which can't be spliced or fulled. The Åsle mitten from Västergötland is dated 1510-1640; Lund mitten before 1400.
- 4Ellen Hagen. Needle binding: a short guide. Museum of Archaeology, University of Stavanger (via National Museum of Ireland). verifiedNålbinding is red-listed as a craft in Norway; finds from a Mesolithic net at Tybrind Vig to the 10th-century Coppergate sock, the Mammen grave (970/71), and a medieval Oslo mitten; to make a heel or thumb 'simply jump over a row or area.'