Painting the Design, Liner Work, and Varnish
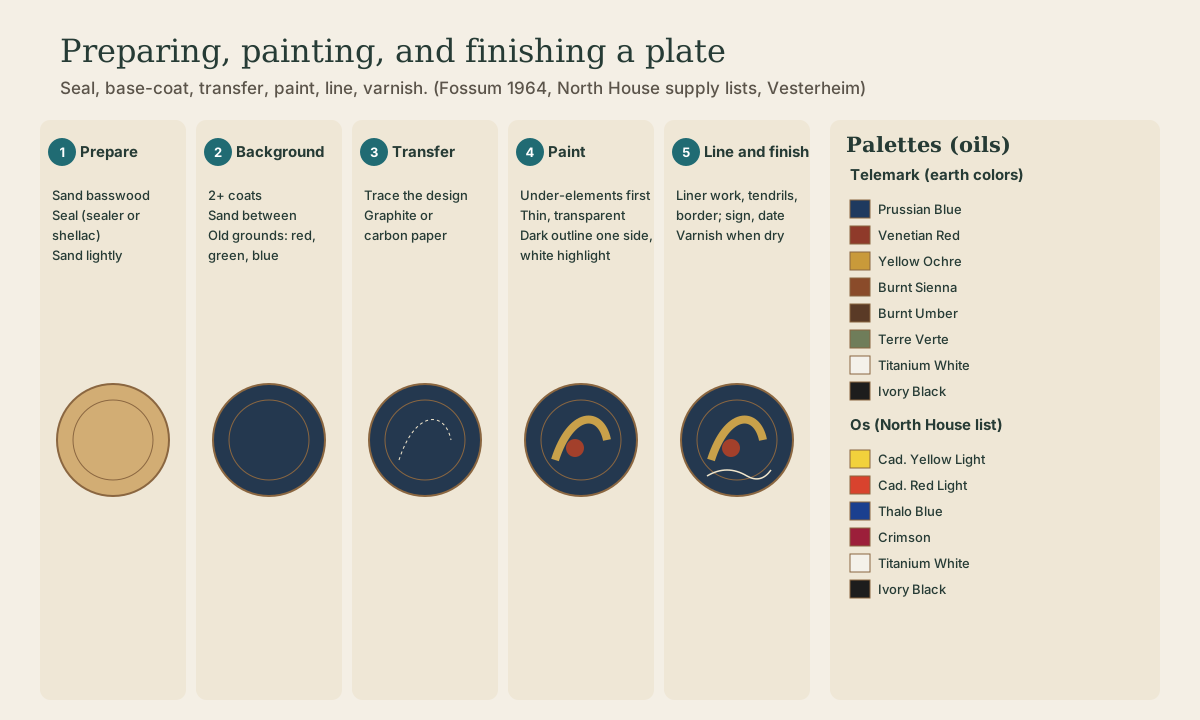
Days two and three: transfer the design, paint the elements underneath first and then those on top in thin color, shade by outlining one side darker and highlighting with white, add liner work, tendrils, and a border, sign and date the piece, and varnish it when dry.
- 2 min
- 5 steps
- 2 questions
- Lesson 186 of 204
In this lesson
- Transfer the design
- Paint the design
- Liner work
- Varnish
- Try it
Picking up where you left off.
Transfer the design
Draw or trace your design on tracing paper and transfer it with graphite or carbon paper 1. Odalen’s class bases its Telemark design on a museum piece 2: draw from photographs of old work, such as Hansson’s ale bowl, rather than inventing from nothing. For Telemark, build the layout from a root or scroll in an asymmetrical sweep; for Os, decide early whether it will be symmetrical 3.
Paint the design
- Paint the elements that lie underneath first, the main scrolls and large leaves, and those on top afterward.
- Keep Telemark color thin and transparent 3.
- Shade the old way: “Outline one side of a leaf or petal with black, highlight the main color with white” 1.
- For Os, abstract the flowers, vein the leaves with heavy line work, and keep shading less dimensional 4.
Quick check
Simple contrast does the shading; Os is flatter still.
Liner work
Old line work was outline and contour, done with brushes of a few squirrel-tail hairs 1. With a liner brush and thinned paint:
- Outline the scrolls and petals on one side.
- Add white highlights and fine tendrils springing from the scrolls.
- Paint a border of small strokes around the rim.
Erase any transfer lines that show once the paint is dry, and sign and date the back or rim.
Playback is optional. If the player is unavailable, open the video at its source.
Quick check
Varnishing too soon traps solvent and can wrinkle oil paint.
Try it
Before transferring the design, paint its main scroll alone on the practice board, three times. The third will be noticeably freer; that is the one to match on the plate.
Lesson complete
Nice work.
Sources for this lesson
- 1Gladys H. Fossum. Rosemaling: History, Instructions, and Designs. Gladys H. Fossum, Racine, Wisconsin. 1964. verifiedOld line work used brushes of a few squirrel-tail hairs; red, yellow, and green with black and white were the common colors. Suggested tubes: Prussian blue, vermilion, cadmium yellow, burnt umber, burnt sienna, black, white; pure sable brushes sizes 1 and 3 or 4. 'Outline one side of a leaf or petal with black, highlight the main color with white'; burnt umber and sienna in red give old rusty reds. Seal the wood with shellac, sealer, or varnish, sand, then paint one, two, or more background coats; red and green were common old grounds; transfer with carbon; varnish to finish.
- 2Telemark-Style Rosemaling. Vesterheim Folk Art School. verifiedNancy Odalen, August 21-23, 2026, 9-5, advanced beginner through advanced; starts Thursday evening 'to give you time to purchase your wooden wear and paint the background.' Project: 'a 16" scooped bowl using a Telemark design that is inspired by a piece found in Norway at the Norske Folk Museum in Oslo'; the design 'is mainly flowers and lacks the Telemark scrolls' but has 'the lovely asymmetrical flow that typically represents Telemark.' Students visit the Vesterheim collection.
- 3Rosemaling. Norwegian Wikipedia (Bokmål). verifiedTelemark: motifs not symmetrical; leaves and flowers spring or wind out of a scroll; colors more transparent than dense. Os, from Hordaland: fewer flowers and more leafwork, symmetrical or asymmetrical, often with geometric forms; grounds often red, black, or white; clear, transparent colors.
- 412" Os Rosemaled Plate #2 by Mary Schliep. North House Folk School store. verifiedOs: 'Flowers are abstracted and the use of geometric shapes is a hallmark of this style. Leaves have a characteristic use of heavy line-work for veins, and shading is less dimensional. Designs can be symmetrical or asymmetrical.' Backgrounds often black or white, occasionally red, green, or blue. Pronounced 'Oose.'
- 5Rosemaling: Shaded Telemark Style Traditions. North House Folk School. verifiedMary Schliep and Kim Garrett. Brushes #2 liner and #2/#4 filberts. Palette: Ivory Black, Titanium White, Venetian Red, Prussian Blue, Burnt Sienna, Burnt Umber, Terre Verte, Raw Sienna, Caput Mortuum, Yellow Ochre, optional Cadmium Red Light. Practice board of masonite or cardboard with two coats of dark acrylic (blue, red iron oxide, black, or dark green) and matte spray varnish; tracing and transfer paper, palette knife.