Bending the Tips and Camber
Days one and two: make the template and cut the outlines, thin the bending zone, build an adjustable mold, then soak or steam the skis and clamp them in to set overnight. How long to steam, why the tip must be thin, when a bend needs a strap, and how much to overbend for springback.
- 4 min
- 6 steps
- 2 questions
- Lesson 140 of 204
In this lesson
- Template and outline
- Thin the bend
- Build the mold
- Soak or steam
- Bend and set
- Try it
Picking up where you left off.
Template and outline
Talbot made a template from 1/4-inch plywood so both skis come out the same: mark the length and the widths at tip, waist, and tail; draw the tip by hand; and trace the long side curves along a thin batten clamped at the ends and sprung to the waist width 1. Trace the template onto each blank and saw the outline, keeping outside the line; Talbot found a jigsaw drifted and recommends a bandsaw 1. Hansen’s class used a bandsaw too, though another class shaped skis with axe, plane, and drawknife 2.
Leave the top flat for now: you’ll taper the thickness after bending, but the bending zone must be thinned first.
Thin the bend
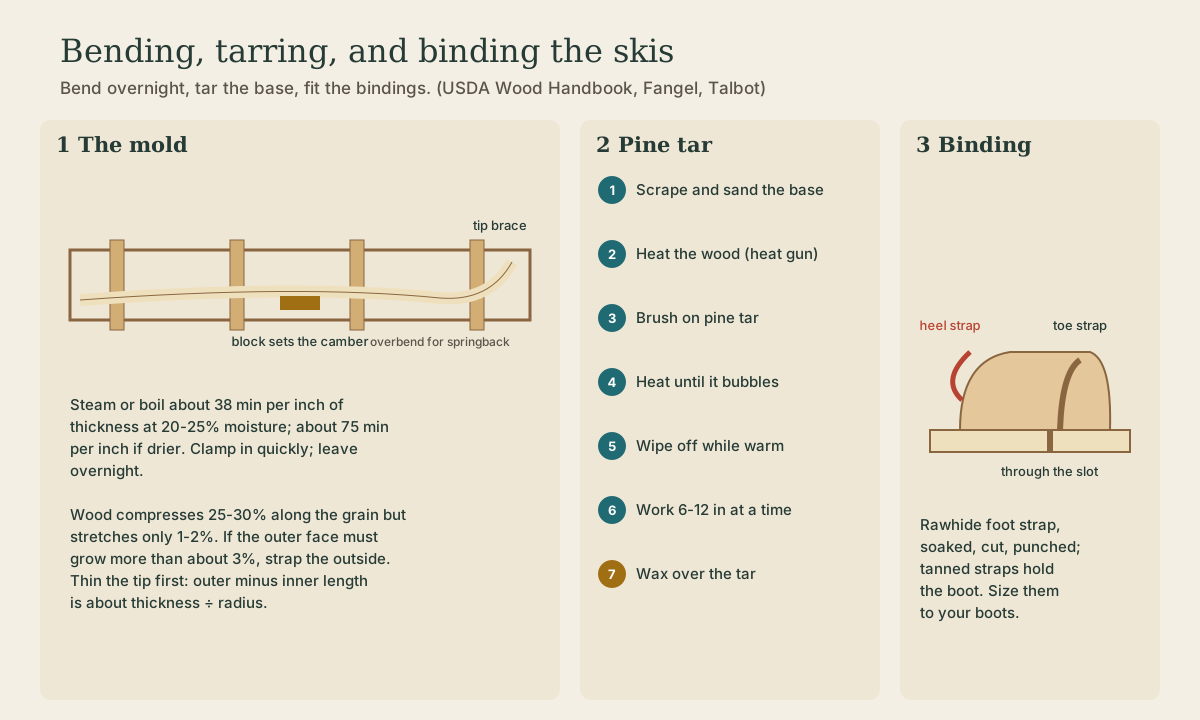
Plasticized wood can be compressed 25 to 30 percent along the grain but stretched only 1 to 2 percent. When a bend would make the outer face more than about 3 percent longer than the inner, industry uses a metal strap on the outside to carry the tension 3.
The outer face grows by about thickness ÷ radius. A tip 3/8 inch thick bent around a 12-inch radius stretches about 3 percent, right at the limit; a 3/4-inch tip on the same curve would split. So:
- Plane the front 18 to 24 inches down to about 3/8 inch before bending, thinning gradually from the full thickness behind it. Talbot’s finished skis taper to 5/16 inch at tip and tail 1.
- Make the curve gentle and long. Richardson’s ideal bend begins so gradually that you can’t say where it starts, and a thin bend is stronger in use than a thick one 4.
- If a tip still cracks, bend the next one with a thin steel strap clamped along its top face.
The arch under the foot is so slight, 3/4 inch over several feet, that it needs no thinning.
Quick check
The outer face grows by about thickness divided by radius; past about 3% the outside fails without a strap.
Build the mold
Talbot’s form is a long box of two 1x8 pine boards held 12 inches apart by cross braces, wide enough for both skis at once. He drew the tip curve a little steeper than he wanted, because the wood springs back after it comes out, and screwed the tip braces in place so they can be moved; one brace holds the tip down into the curve 1. Hansen’s students adjusted their molds to set the camber under the foot at the same time as the tip 2.
To set the camber, put a block about 3/4 inch thick under the foot of the ski and clamp tip and tail down. The ski comes out with a little less arch than the block once it springs back.
Soak or steam
The Wood Handbook’s times: steam or boil about 38 minutes per inch of thickness for wood at 20 to 25 percent moisture content, and about 75 minutes per inch for drier wood. Below 20 percent, heat alone isn’t enough and moisture must be added too 3; unless you know your blanks are wetter, use the longer figure.
Hansen’s class soaked the blanks in a hot-water bath on the wood stove 2. A steam box works too: a closed plywood box or pipe long enough for the front third of the ski, fed with steam from a kettle or wallpaper steamer. Soaking the tips in water for a day beforehand adds some of that moisture.
Quick check
The Wood Handbook gives about 38 min per inch at 20-25% moisture and 75 min per inch for drier wood.
Bend and set
Work fast once the wood is hot:
- Pull one ski from the heat, set its foot on the camber block, and clamp the tail.
- Press the tip down into the curve steadily, not in jerks, and lock it under the tip brace.
- Clamp everything and do the second ski.
- Leave them overnight. Hansen’s skis set overnight before release 2; longer is better if the wood is wet.
A bent piece keeps its shape once it has cooled and dried in the form. Later changes in moisture can relax the bend, which is one reason to seal the skis 3.
Playback is optional. If the player is unavailable, open the video at its source.
Try it
Bend a test strip first: a piece of your birch 3/8 inch thick and 2 feet long, steamed and bent around the tip curve. If it cracks on the outside, thin the skis more or use a strap; if it springs back a lot, steepen the curve in the mold.
Lesson complete
Nice work.
Sources for this lesson
- 1Making Traditional Scandinavian Wooden Skis. The Argobuilder. verifiedA Wisconsin build: sized ground to wrist with the arm up; adjustable steam-bending form of 1x8 and 2x4 pine with removable cross braces, tip curve drawn steeper than wanted for springback; 1/4-in plywood template, side curve drawn with a batten; ash blanks 1 1/16 x 4 x 80 in, air-dried preferred; 3/8 x 1/16 in groove from 12 in behind the tip to 12 in from the tail; tapered to 5/16 in at tip and tail.
- 2Greg Fangel. Traditional Birch Ski Making. Wooden Cross-Country Skis. verifiedAccount of Mark Hansen's 2 1/2-day North House class: pre-cut birch blanks soaked in a hot-water bath heated by a wood stove; molds adjusted, including camber under the foot; skis set overnight; then cut, gouged, scraped, and chiseled to a pointed ski, band saw allowed; decorative tips and lines; pine tar on the base, wax over it; Norwegian leather bindings: rawhide foot strap soaked, cut, and punched, tanned leather straps sized to the footwear.
- 3Rebecca E. Ibach. Specialty Treatments (Chapter 19). USDA Forest Service, Forest Products Laboratory (Wood Handbook, FPL-GTR-190). 2010. verifiedSteam or boil about 15 min/cm (38 min/in) of thickness at 20-25% moisture content, 30 min/cm (75 min/in) for drier wood. Plasticized wood compresses 25-30% parallel to the grain but stretches only 1-2%; bends needing more than about 3% difference between outer and inner faces need a metal strap with end fittings. Birch, ash, hickory, oak are good bending species. Cool and dry the piece held in shape. Laminated members: dry laminations bent without end pressure against a form and bonded in one operation; bending thin laminates needs only moderate stress, no steam, and gives stronger members than single-piece bends; laminated bends change shape less with moisture; thickness-to-radius ratios impossible in single pieces are easy; any length can be made.
- 4E. C. Richardson. The Ski-Runner. Published by the author, London. 1909. verifiedSkis about 7 1/2 ft long, 3 1/2 in wide, 1 in thick. Size: tip reaches the middle of the fingers with the hand held above the head. Arch no more than 3/4 in; bend rising 5-6 in, gentle like a bow; broader at the bend and heel; groove about 1/12 in deep and rounded (Swedish 1/8 in, rectangular); a narrow slit near the middle for the binding. Ash and hickory preferred; birch light but apt to be brittle; Norwegian birch skis impregnated with tar.