The Casing: Planing, Rebate, and Dovetails
Days six through nine: plane four rough-sawn boards straight, flat, and square by hand, make the rebate the sash closes into (ploughed from the solid or an applied stop), dovetail the corners, mould the edge, and fit the sash with the 1 to 2 millimeter clearance old Norwegian windows have.
- 3 min
- 5 steps
- 2 questions
- Lesson 121 of 204
In this lesson
- Plane the boards
- The sash rebate
- Dovetail the corners
- Mould and fit
- Try it
Picking up where you left off.
The casing (karm) is the frame the sash hangs in. North House spends four days on it, starting from rough-sawn boards and hand planes 1.
Plane the boards
From rough lumber, make each board flat, straight, and square in the classic order:
- Scrub plane across the grain to take down the high spots of one face.
- Jointer plane along the grain until the face is flat (check with winding sticks and a straightedge).
- Joint one edge straight and square to that face.
- Gauge the thickness from the flat face all around, and plane down to the line.
- Gauge the width from the jointed edge and plane to it.
Learning to make a board straight and flat by hand is one of the class’s stated goals 1.
The sash rebate
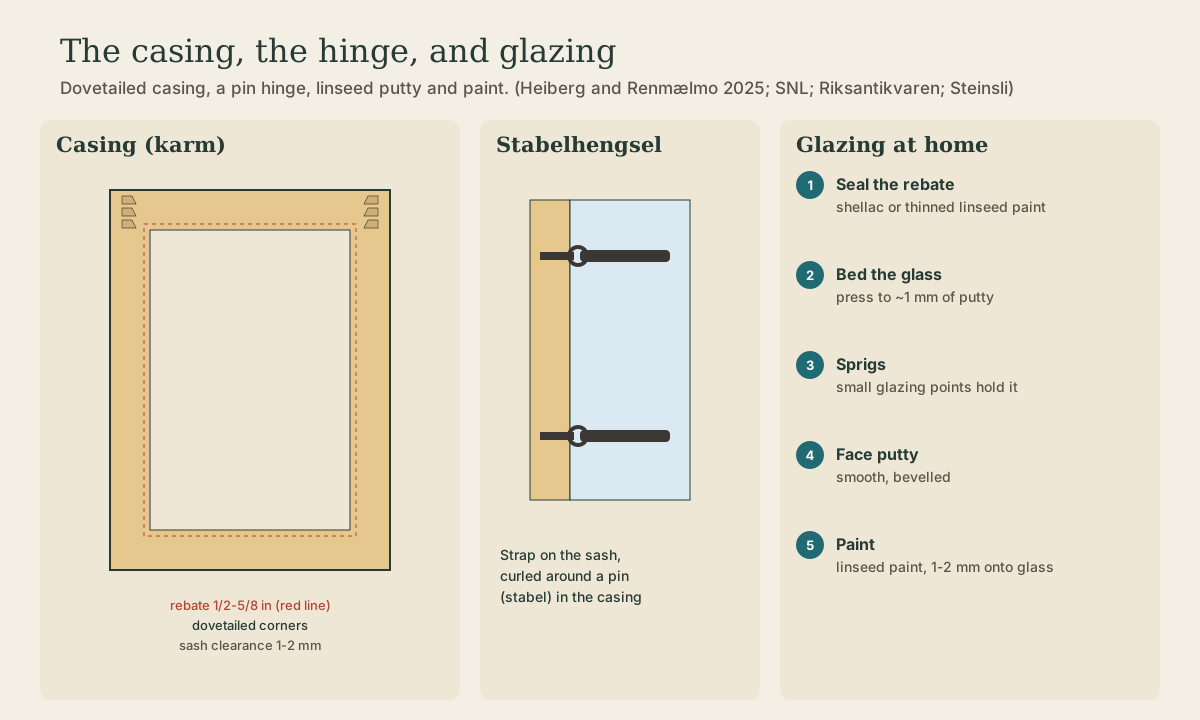
The sash closes into a rebate along the inner edge of the casing. At Stiftsgården it was 5/8 inch; the study notes 1/2 inch is usual on most 18th- and 19th-century casings 2. North House explores “a couple of strategies” without naming them 1. The two obvious ones:
- From the solid: plough or rebate the rebate directly into the casing boards.
- Applied stop: plane the casing as a plain board and fasten a separate strip along its edge to form the rebate.
The first is stronger and more traditional; the second is faster and easier to correct.
Dovetail the corners
At Stiftsgården the casing head was joined to the jambs with dovetails; on one casing the upper dovetails were even beveled for a tighter fit 2. North House dovetails all four corners 1:
- Mark the tails on the head and sill, pins on the jambs (or the reverse), gauged to the board thickness.
- Saw the tails, chop the waste, and transfer them to the pin boards with a knife.
- Saw and chop the pins, staying on the waste side of the knife lines.
- Keep the rebate continuous across each corner: the rebate’s depth must be accounted for in the joint, or the corner shows a gap.
Quick check
At Stiftsgården the head was dovetailed to the jambs.
Mould and fit
Mould the inner edge of the casing to match the sash profile, then assemble. Fit the sash into its rebate with a close clearance: old windows have 1 to 2 mm between sash and casing, against 10 to 18 mm in many new ones 3. Plane the sash edges to fit, remembering the 8- to 10-degree bevel on the closing edge.
Hinges. The traditional Norwegian window hinge is the stabelhengsel: a narrow strap on the sash that ends in a curl around a pin fixed in the casing 4. Small hand-forged strap-and-pin hinges are the closest US equivalent. Grease them with petroleum jelly, as Riksantikvaren advises for old window hardware 5.
Quick check
Modern windows often have 10-18 mm; the old fit was far closer.
Try it
Plane one rough board flat and square entirely by hand before starting the casing, and time it. The casing is four boards; knowing your time per board makes the next four days predictable.
Lesson complete
Nice work.
Sources for this lesson
- 1Traditional Building: Norwegian Sash Windows. North House Folk School. verifiedNine days with a day off (May 4-12, 2027), instructor Thor-Aage Kaminka Heiberg (master joiner, head of NTNU's Norwegian traditional building crafts program); tuition $875, materials $180. Build a traditional Norwegian sash window in its casing with hand-tool joinery: first four days the sash from pre-milled stock, rails and stiles with a crossed vertical and horizontal bar, open mortises and tenons locked with pegs; next four days the casing from rough-sawn boards, planed straight and flat by hand, cut to size, a couple of strategies for the sash rabbet, dovetailed corners; all parts moulded with traditional sash profiles using planes the instructor provides. Students bring home a four-pane window; glazing is done at home. All tools provided; optional scrub, smoothing, jointer and block planes, saws, chisels, mallet, mortise gauge, plow and rabbet planes.
- 2Thor-Aage Kaminka Heiberg, Roald Renmælmo. Rediscovering the 18th Century Wooden Casement Window Manufacturing Process at Trondheim Stiftsgården. Studia Vernacula 17, 170-199. 2025. verifiedStiftsgården sashes (1774-78): 48 x 25 1/2 in, six lights; stiles and rails 2 1/16-2 1/4 in wide, 34.6-34.8 mm thick; stile edges beveled about 8-10 degrees to open freely; corners open mortise and tenon, each locked with two 8 x 8 mm square pegs driven from the interior. Horizontal bars tenoned into the stiles; the vertical bar in separate pieces between rails and bar; bars 25.5 mm (1 in) wide x 31.75 mm (5/4 in) high. Casing rebate 5/8 in (1/2 in usual); casing head dovetailed to the jambs. Probably Scots pine; pith side facing out and toward the sash center. Norway normally mitres the moulding at rail and bar joints rather than coping. Trondheim profile from the edge: fillet, ovolo, fillet, cove; on bars the quarter-rounds meet as a bead. Glass rebate on museum planes about 9 x 6 mm. Two workflows tested: joint first and mould after (judged the more natural joiner's sequence), or mould first with side plane and mitre chisel. Take dimensions from the inside light size; a sticking board holds bars for moulding. About one sash per day at a calm pace, two with practice.
- 3Ellev Steinsli. Godt handverk. Trondheim kommune, Byantikvaren. verifiedOld windows have 1-2 mm clearance between sash and casing; new ones 10-18 mm. Recommends slow-grown resinous pine (or slow-grown spruce), linseed putty, and cylinder or restoration glass.
- 4A. Gunnarsjaa. stabelhengsel. Store norske leksikon. 2021. verifiedA hinge whose narrow strap on the sash ends in a curl around a pin (stabel) fixed in the casing; the traditional Norwegian window hinge.
- 5Vedlikehold av vinduer. Riksantikvaren (Norwegian Directorate for Cultural Heritage). verifiedPrime bare wood in the putty rebate with thinned linseed oil paint; bed the glass in putty, pressing until the bed putty is about 1 mm, fix with glazing sprigs, putty the outside, and once the putty has dried somewhat paint it with linseed oil paint, running a couple of millimeters onto the glass. Don't paint the hinge-side edge or the sash binds. Repair wood should be slow-grown, resinous pine (malmfuru). Hardware: corner irons and hinges, greased with petroleum jelly.