Gouges and Relief Carving
The tools and sequence behind Scandinavian ornament: gouge sweeps and widths, a starter set, holding the work, outlining and setting in, grounding the background, modeling the design, and keeping curved edges sharp.
- 4 min
- 6 steps
- 3 questions
- Lesson 20 of 204
In this lesson
- Gouges
- Holding the work
- The relief sequence
- Sharp tools
- Try it
- What to take from this
Picking up where you left off.
Gouges
A gouge is a chisel with a curved cutting edge. Two numbers describe it:
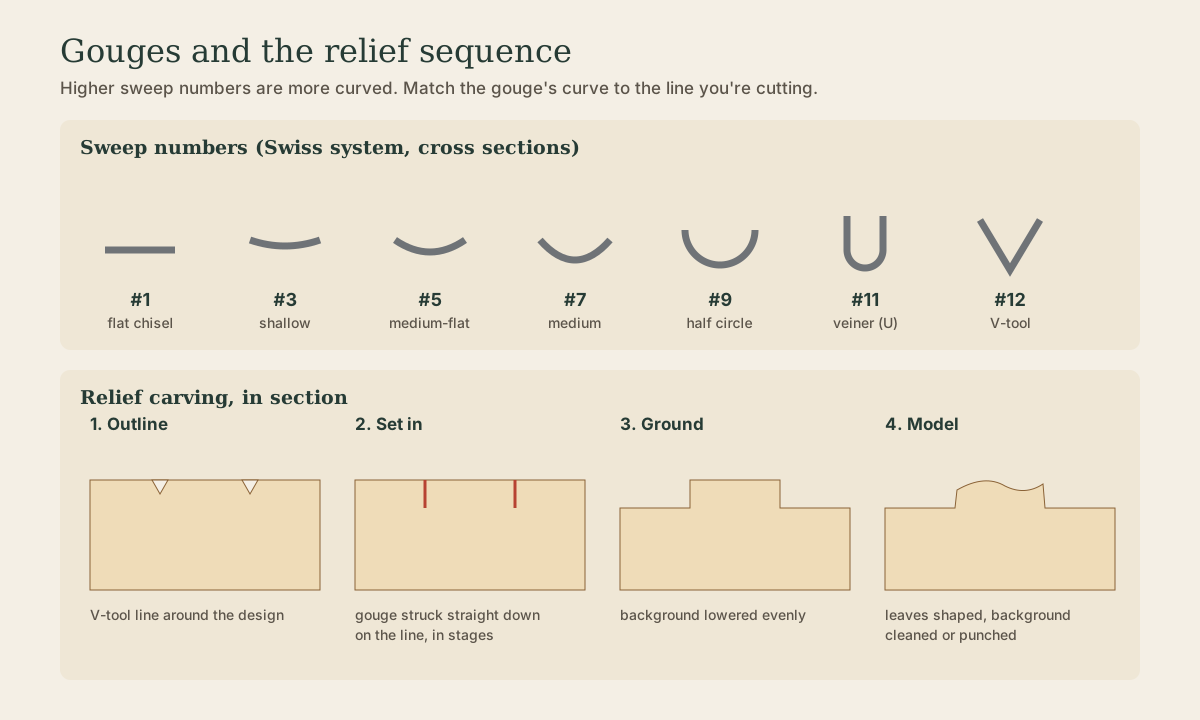
- Sweep: how curved the edge is. In the common Swiss system, #1 is a flat chisel, #3 a barely curved gouge, #5 and #7 medium sweeps, #9 roughly a half circle, #11 a deep U-shaped veiner, and #12 a V-tool (parting tool).
- Width: in millimeters.
So a “#7-14” is a medium-sweep gouge 14 mm wide. Other makers use slightly different numbers; what matters is matching a gouge’s curve to the curve you’re cutting.
A starter set for Scandinavian ornament: a V-tool (#12, 6-8 mm), shallow gouges (#3, 10-16 mm) for grounding and flat areas, two or three medium sweeps (#5 and #7 in a couple of widths) for leaves and curves, a deep #9 or #11 for veins and hollows, a skew chisel, and a wooden or urethane mallet. Buy a few good tools rather than a big cheap set.
Playback is optional. If the player is unavailable, open the video at its source.
Quick check
Width is given separately in millimeters; #9 is about a half circle.
Holding the work
Relief carving needs both hands on the tool: one pushing, one guiding and braking. Hold the work down with a holdfast, clamps, or a bench hook, or screw it to a backer board clamped in the vise (see Holdfasts, Planing Stops, and Simple Workholding in Pre-Industrial Furniture Making). Basswood and butternut are forgiving to learn on; birch and oak are traditional but harder.
The relief sequence
- Transfer and outline: trace the design on, then run a V-tool just outside the lines to separate the design from the background.
- Set in: drive gouges straight down along the lines with light mallet blows, choosing a gouge whose curve matches each part of the outline. Set in shallow, clear the waste, then set in again; trying to go full depth at once crushes the edges.
- Ground: lower the background to an even depth with shallow gouges, cutting toward the set-in walls. Mark the depth on the panel’s edge and check often.
- Model: shape the raised design: roll leaves over, hollow their centers, cut veins with a veiner, and let lobes overlap.
- Clean up: tidy the walls and background. Leave crisp tool marks; don’t sand. A punched or textured background hides small unevenness.
Always cut with the grain or across it; cutting into the grain lifts splinters ahead of the edge. On curves, the right direction changes partway round, so cut each half from the outside in.
Quick check
Choose a gouge whose curve matches each part of the line, and set in in stages.
Quick check
A depth gauge or pencil line on the edge helps keep it even.
Sharp tools
A gouge is only as good as its edge. Sharpen the outside bevel by rolling the gouge on a stone as you push it, strop the edge on leather loaded with compound, and remove the inside burr with a shaped slip stone or a folded strop. Strop every few minutes while carving; a gouge that leaves a dull, torn surface instead of a shiny cut needs it. The North House acanthus course starts with tool selection and sharpening for this reason 1.
Try it
Lay out a simple leaf on a basswood board. Outline with a V-tool, set in with matching gouges, ground the background 1/8 in. deep, and model the leaf with a center vein. Strop before and halfway through.
What to take from this
Gouges are named by sweep (higher numbers are more curved; #9 is about a half circle, #11 a veiner, #12 a V-tool) and width in millimeters. Relief carving goes outline, set in, ground, model, clean up: set in shallow in stages, lower the background evenly, cut with the grain, and keep every edge stropped.
Lesson complete
Nice work.
Sources for this lesson
- 1Acanthus Relief Carving. North House Folk School. verifiedThe acanthus motif, used by ancient Greek stone carvers and refined in the Baroque, reached northern Europe in the 17th century and became prominent in Scandinavian carving in the 18th and 19th centuries; course carves standard acanthus forms on shelves, candleholders, and bread servers.