Square Rule
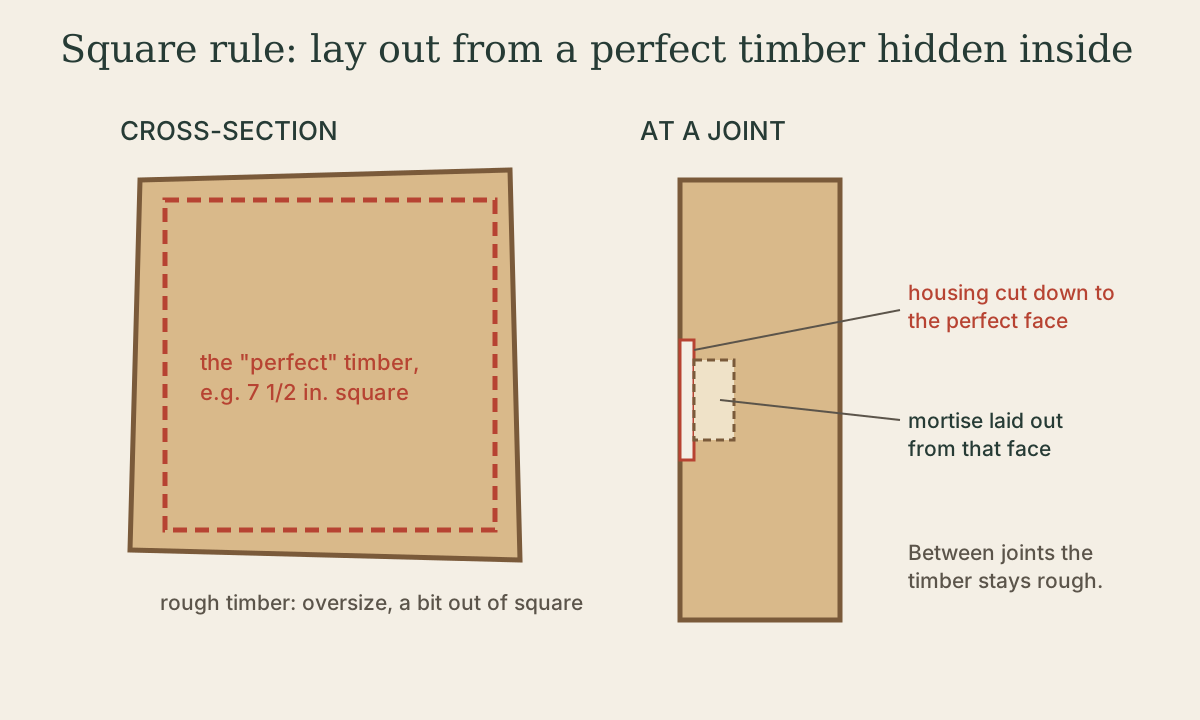
Square rule imagines a perfect, slightly smaller timber inside every rough one and cuts housings down to it at each joint, so every timber can be laid out alone and pieces of the same kind are interchangeable.
- 4 min
- 5 steps
- 3 questions
- Lesson 49 of 204
In this lesson
- The idea
- Housings and reductions
- Laying out a timber
- Strengths and weaknesses
- What to take from this
Picking up where you left off.
The idea
Square rule was developed by American framers in the early 1800s, especially in New England, to frame faster with sawn timbers. Its insight: inside every rough, slightly crooked, oversize timber there is a smaller, perfect timber. If you lay out every joint relative to that perfect timber, you don’t need to fit timbers to each other; every joint is defined by the ideal dimensions on the drawing 1.
For example, a nominal 8×8 that actually measures anywhere from 7 3/4 to 8 1/4 inches, and isn’t quite square, is treated as a perfect 7 1/2-inch timber hidden inside. At every place where another timber joins it, the rough surface is cut down to that 7 1/2-inch face.
Quick check
Square rule assumes a true timber, for example 7 1/2 inches square inside a rough 8×8, and reduces the timber to it only where joints occur.
Housings and reductions
The cut that reduces a timber to its perfect dimension is a housing: a shallow, flat seat cut into the post at the joint, typically 1/2 to 1 inch deep depending on how oversize the timber is. The incoming beam sits in the housing, so its bearing surface is the true face, not the rough one. Similarly, the end of a beam may be reduced on its underside where it seats, so it bears at its ideal depth. Between joints, the timber is left rough and full size.
Because housings are cut parallel to the timber’s reference faces (the outside and top faces that align with the building planes), every joint ends up in the right place relative to the building, regardless of the timber’s actual size or wind.
Quick check
All layout comes from the reference faces and that ideal size.
Laying out a timber
A typical square-rule sequence for a post 2:
- Choose reference faces: two adjacent faces that will face out and up (or a consistent pair for every timber of that type), marked with arrows.
- Check crown and wind and decide which way any bow goes; crowns usually go up in beams and out in posts.
- Measure from the reference faces to the perfect timber’s other faces, using the ideal dimension (say 7 1/2 inches), and mark the housing depth where it’s needed.
- Lay out all joints from the reference faces and the ideal dimensions, never from the far, rough faces.
- Cut housings first, then mortises or tenons, measuring from the housing or reference face.
Done carefully, every post of a given kind is interchangeable with the others, and beams can be cut on one sawhorse while posts are cut on another.
Strengths and weaknesses
Strengths: - Each timber is laid out and cut independently: faster, needs no scribing floor, and suits a crew. - Interchangeable pieces of the same kind. - Works well with sawn timbers that are close to size.
Weaknesses: - Requires timbers to be reasonably straight; very crooked or hewn timbers waste a lot of wood in housings. - Housings take time to cut and show in the finished frame. - Joints only fit as well as the layout is accurate; there’s no fitting to a partner.
Square rule is what most hand-tool framers and folk schools teach today, including for small frames like those at North House.
What to take from this
Square rule assumes a perfect, slightly smaller timber inside each rough one, for example 7 1/2 inches inside an 8×8, and cuts housings down to it wherever joints occur. All layout comes from reference faces and ideal dimensions, so timbers are laid out independently and similar pieces are interchangeable. It’s faster than scribe rule but needs reasonably straight timbers.
Practice
Because every joint is laid out from the same ideal timber dimensions, timbers needn’t be fitted to each other, so work goes faster and parts can be prefabricated.
Lesson complete
Nice work.
Sources for this lesson
- 1Jack A. Sobon, Roger Schroeder. Timber Frame Construction: All About Post-and-Beam Building. Storey Publishing. 2012. verifiedClassic reference (first published 1984) on timber selection, tools, joinery, frame types, assembly, and raising. Cited at: Layout.
- 2Will Beemer. Learn to Timber Frame: Craftsmanship, Simplicity, Timeless Beauty. Storey Publishing. 2016. verifiedHeartwood School's step-by-step guide from timber sourcing to a finished 12×16 frame, including layout, joinery, and raising. Cited at: Layout.