Boring Tools and Power Tools for Framing
Mortises begin as bored holes - by brace, boring machine, or a slow, high-torque drill with a ship auger - and specialty power tools speed the rest; safety around kickback and torque is the main skill.
- 4 min
- 5 steps
- 3 questions
- Lesson 47 of 204
In this lesson
- Boring mortises
- Peg holes
- Power tools that speed framing
- Safety with framing power tools
- What to take from this
Picking up where you left off.
Boring mortises
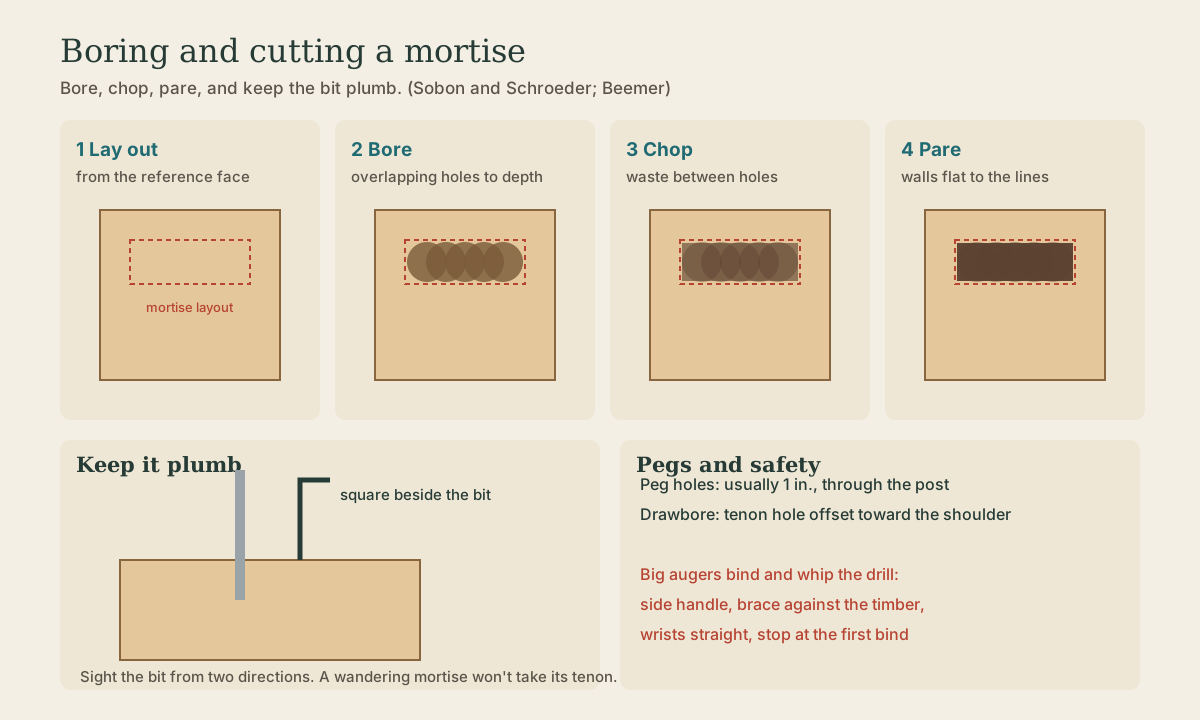
Most mortises start as holes. Lay out the mortise, then bore a row of overlapping holes to depth with a bit the width of the mortise (1 1/2 inches for a 1 1/2-inch mortise), staying inside the lines. Then chop and pare the walls flat and the ends square with the framing chisel and slick 1.
Ways to bore:
- Brace and auger bit: the traditional hand method, slow but controllable.
- Boring machine: a 19th-century hand-cranked machine you sit on, which drives an auger straight down into the timber. Still a joy for small frames.
- Electric drill with a ship auger or a self-feeding bit: the modern standard. Use a slow, high-torque, half-inch drill (a “hole hawg” type), not a light cordless drill.
Keep holes plumb. Sight down the bit from two directions, or use a guide block or a square standing beside the bit. A mortise that wanders is a tenon that won’t fit.
Quick check
A row of overlapping holes, bored to depth, takes out most of the wood. The chisel pares the sides flat and squares the ends.
Peg holes
Bore peg holes, usually 1 inch for a 1-inch peg, through the post at the marked locations, after the mortise is cut and before assembly. In drawbored joints, the tenon gets its own hole, offset toward the shoulder (covered in the joinery module). Back up the exit side with a block or bore from both sides to avoid blowout.
Power tools that speed framing
- Circular saw: shoulders, cheeks, and end cuts. Most-used power tool on the job.
- Beam saw: a large circular saw, 10 to 16 inches, that cuts through big timbers in one pass.
- Chain mortiser: a guided chainsaw-like cutter that plunges rectangular mortises quickly.
- Power planer and timber planer: surface timbers and true faces.
- Chainsaw: rough cuts and big tenon cheeks, used carefully.
- Router: housings and repetitive work with jigs.
- Drill press-style mortise guides and drilling jigs.
None are required for a small frame. North House’s build-your-own courses use specialized tools that students can learn on, with hand tools still doing the finishing 2.
Safety with framing power tools
- Drills: big augers in high-torque drills can bind and whip the drill around. Use the side handle, brace against the timber, keep wrists straight, and stop at the first bind.
- Circular saws: kickback happens when the blade pinches. Support the timber so the cut opens, keep the blade guard working, stand to the side of the cut line, and never reach under the saw.
- Chainsaws and chain mortisers: chaps, gloves, eye and ear protection, and a firm stance; respect kickback from the bar tip.
- Dust and noise: hearing protection and a dust mask, especially when planing.
- Electrical: outdoor-rated cords and GFCI protection, kept out of puddles.
Quick check
Big augers can whip the drill around.
What to take from this
Mortises begin as overlapping bored holes, kept plumb, then chopped and pared square. Bore with a brace, a boring machine, or a slow high-torque drill and ship auger; bore 1-inch peg holes after the mortise. Circular saws, beam saws, and chain mortisers speed the work but aren’t required; respect drill torque and saw kickback above all.
Practice
High-torque drills can whip around when a big bit binds. Use side handles, brace the drill, and keep a stable stance.
Lesson complete
Nice work.
Sources for this lesson
- 1Jack A. Sobon, Roger Schroeder. Timber Frame Construction: All About Post-and-Beam Building. Storey Publishing. 2012. verifiedClassic reference (first published 1984) on timber selection, tools, joinery, frame types, assembly, and raising. Cited at: Joinery.
- 2Timber Frame: Build Your Own, Smaller Frames. North House Folk School. verifiedStock frames 10×12 (7 days), 10×16 and 10×16 shed roof (9 days), and a 13×13 sauna; plans provided; students raise the frame at home.
Further reading
- Will Beemer. Learn to Timber Frame: Craftsmanship, Simplicity, Timeless Beauty. Storey Publishing. 2016. verifiedHeartwood School's step-by-step guide from timber sourcing to a finished 12×16 frame, including layout, joinery, and raising.